 云计算服务
云计算服务
 服务器租用
服务器租用
 DDOS 防护
 虚拟主机
虚拟主机
 域名服务
域名服务
 基础设施
基础设施
 关于我们
关于我们
在Java网络开发的过程中接触NIO是必不可少的,在NIO中有一个重要的组件那就是**ByteBuffer**,下面就来通过图文的方式来讲解ByteBuffer的使用以及一些操作的原理。
对于ByteBuffer来说主要有五个重要属性如下:
mark(int类型):记录当前索引的位置position(int类型):读模式:表示接下来可以读取的数据位置, 写模式:表示可以写入数据的位置limit(int类型):读模式:表示可以写入数据大小,写模式:表示可以写入数据大小。 默认是ByteBuffer的capacitycapacity(int类型):ByteBuffer的容量hb(byte array):实际数据存储byte数组Tips: 几个数据之间的大小关系mark <= position <= limit <= capacity
示意图如下:
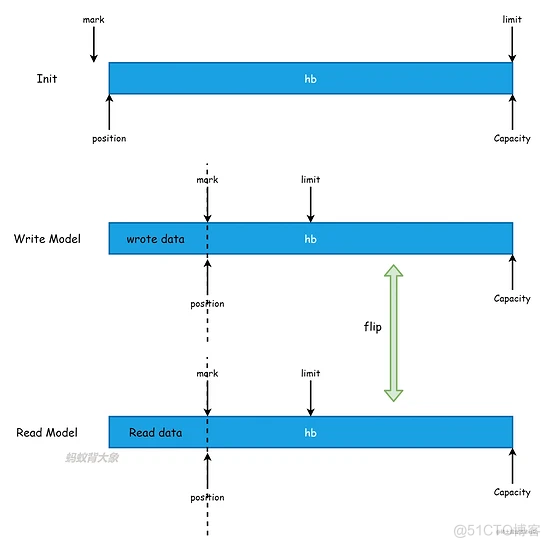
ByteBuffer主要有读写模式,Java原生的和Netty的ByteBuf有不同的。ByteBuffer的读写模式需要自己进行切换。
2.1 写模式写模式示意图如下:
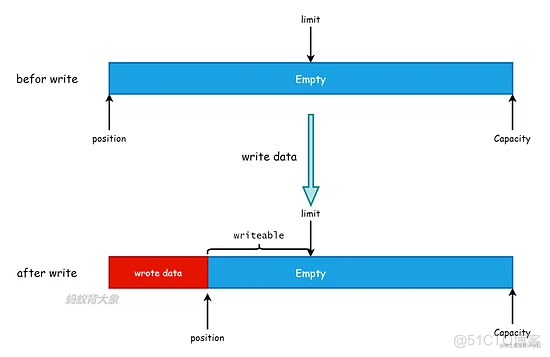
从上图可以看出来初始化后capacity是固定了。limit的值可以进行设置。当有新的数据写入position指针会进行移动。能写入的数据由limit确定。
2.2 读模式读模式示意图如下:
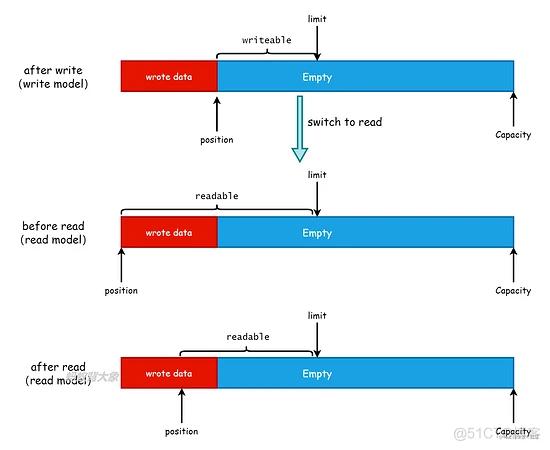
如何把写入的数据读取出来,首先要将写模式转换成成读的模式。否则会读模式会在在写的指针往后进行读取。随着数据读取position指针也会进行移动,limit会限制指针移动的位置。
Tips:flip方法用于读写模式切换
对于ByteBuffer主要是弄清楚四个变量position、limit、mark、capacity四者之间的关系转换以及读写的关系转换。
下面会结合例子以及示图来说明ByteBuffer的一些基本使用和一些常见API的操作。如下是一个简单的使用示例:
public class ByteBufferExample {
    public static void main(String[] args) {
        ByteBuffer allocate = ByteBuffer.allocate(20); //分配一个大小为20bytes的ByteBuffer
        System.out.println(allocate.capacity()); //20
        System.out.println(allocate.limit()); // 20
        System.out.println(allocate.position()); //0
        System.out.println("--------------------");
        allocate.putLong(10L);
        System.out.println(allocate.capacity());//20
        System.out.println(allocate.limit());//20
        System.out.println(allocate.position());//8
        System.out.println("--------------------");
        System.out.println(allocate.getLong());
        System.out.println(allocate.capacity());//20
        System.out.println(allocate.limit());//20
        System.out.println(allocate.position());//16
    }
}
不同的变量变化的示意图如下:
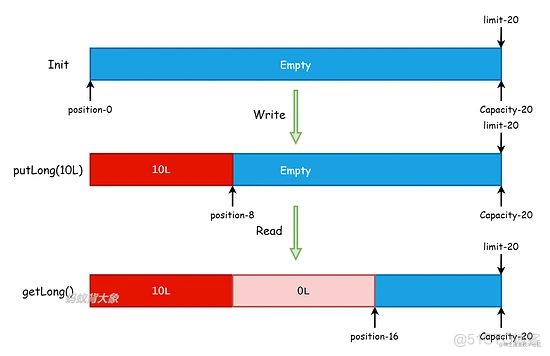
上面代码中没有进行读写模式转换的。position指针不管读还是写会一直往capacity位置靠近。
3.1 flip-API使用示例代码如下:
public static void main(String[] args) throws Exception{

        ByteBuffer allocate = ByteBuffer.allocate(20); //分配一个大小为20bytes的ByteBuffer
        allocate.putLong(10L);
        System.out.println(allocate.capacity()); //20
        System.out.println(allocate.limit()); // 20
        System.out.println(allocate.position()); //8
        System.out.println("--------------------");
        allocate.flip();
        System.out.println(allocate.capacity()); //20
        System.out.println(allocate.limit()); // 8
        System.out.println(allocate.position()); //0
        System.out.println("--------------------");
        System.out.println(allocate.getLong()); //10
        System.out.println(allocate.capacity()); //20
        System.out.println(allocate.limit()); // 8
        System.out.println(allocate.position()); //8
        allocate.putLong(10L); //throw exception

    }
示意图如下:
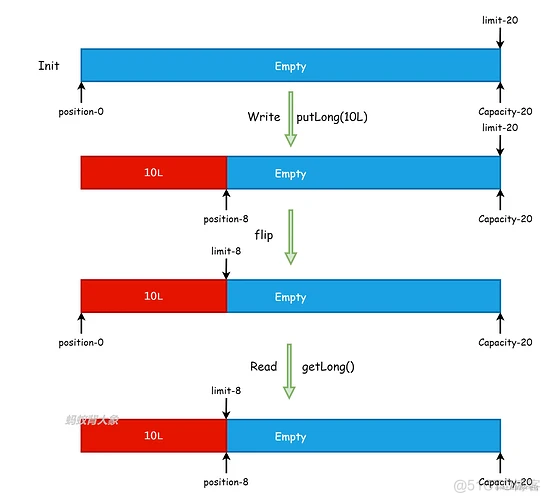
从上面示意图可以看出调用方法**flip**的时候会将写入时候回的position指针的值赋给limit同时重置position的值到0的位置。这里就实现了读写的模式转换。如果再次读取的时候就能够将写入到ByteBuffer的值读取出来。
Tips: 如果你调用flip方法后读取的数据或者写入的数据超过了limit会有错误抛出
3.2 mark-API使用代码如下:
public static void main(String[] args) throws Exception{

        ByteBuffer allocate = ByteBuffer.allocate(20); //分配一个大小为20bytes的ByteBuffer
        allocate.putLong(10L);
        allocate.putInt(1);
        allocate.mark();
        System.out.println(allocate.capacity());//20
        System.out.println(allocate.limit());//20
        System.out.println(allocate.position());//12
        System.out.println("-----------------------");
        allocate.getLong();
        System.out.println(allocate.capacity());//20
        System.out.println(allocate.limit());//20
        System.out.println(allocate.position());//20
        allocate.reset();
        System.out.println("-----------------------");
        System.out.println(allocate.capacity());//20
        System.out.println(allocate.limit());//20
        System.out.println(allocate.position());//12
    }
示意图如下:
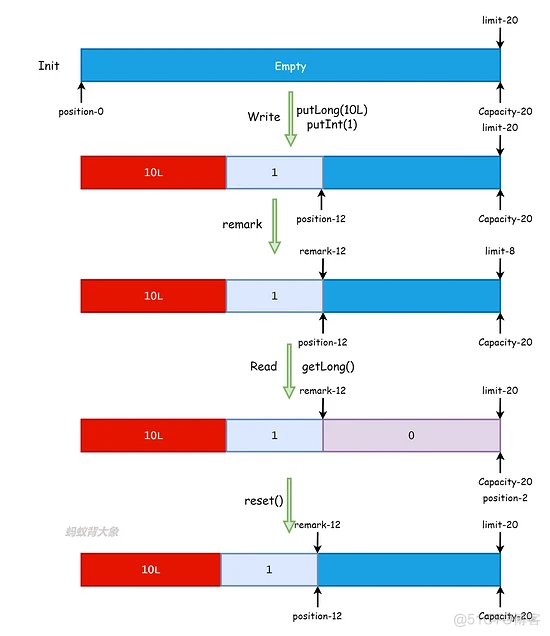
从上图可以知道调用**mark是将position的值赋给mark属性。然后你进行接下来的继续读写操作。当你需要将position恢复到标记字段的时候调用reset** 进行恢复。
Tips: 如果你调用mark然后有调用了flip,flip会将mark进行重置。
3.3 compact-API使用代码实例如下:
public static void main(String[] args) throws Exception{

    ByteBuffer allocate = ByteBuffer.allocate(20); //分配一个大小为20bytes的ByteBuffer
    allocate.putLong(10L);
    allocate.flip();
    allocate.getInt();
    System.out.println(allocate.capacity());//20
    System.out.println(allocate.limit());//8
    System.out.println(allocate.position());//4
    allocate.compact();
    System.out.println("----------------------");
    System.out.println(allocate.capacity());//20
    System.out.println(allocate.limit());//20
    System.out.println(allocate.position());//4
}
示意图如下:
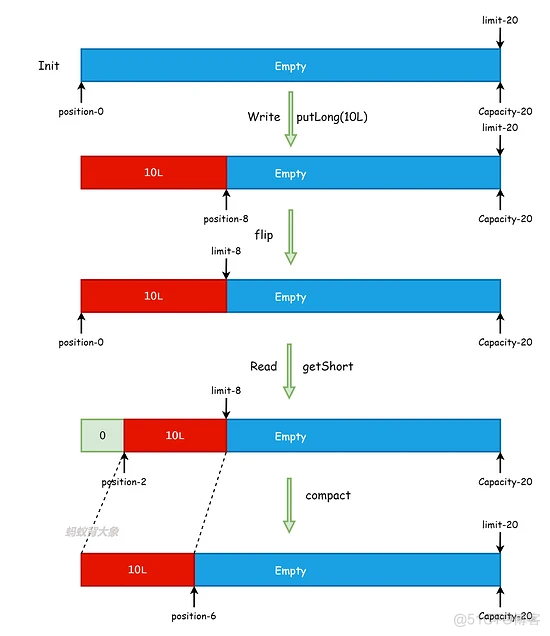
从上图可以看出来**compact**的主要作用:用来清楚掉当前position指针之前的数据然后将指针指向limit的位置同时将整个指针往左移动直到替换掉position左边的数据,与此同时还会将limit的值设置为capacity。
ByteBuffer总体使用起来和Netty的ByteBuf对比没有Netty ByteBuf好用。但是对于使用原生的Java NIO的开发来说也是可以的。主要是需要用户自己对读写进行转换等操作,使用起来比较繁琐。但是整个ByteBuffer的实现还是比较简单的。


.png)

.png)

