 云计算服务
云计算服务
 服务器租用
服务器租用
 DDOS 防护
 虚拟主机
虚拟主机
 域名服务
域名服务
 基础设施
基础设施
 关于我们
关于我们
1.前言关于uiautomator2:
python-uiautomator2封装了谷歌自带的uiautomator2测试框架,提供便利的python接口。他允许测试人员直接在PC上编写Python的测试代码,操作手机应用,完成自动化,大大提高了自动化代码编写的效率。
工作原理以下图片使用Windows画图软件
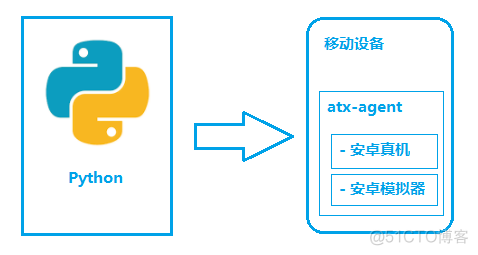
如图所示,python-uiautomator2主要分为两个部分,python客户端,移动设备
python端: 运行脚本,并向移动设备发送HTTP请求移动设备:移动设备上运行了封装了uiautomator2的HTTP服务,解析收到的请求,并转化成uiautomator2的代码。版本要求:
本案例以genymotion模拟器为例sdk api version 5.0 :
Requirements uiautomator2Android版本 4.4+Python 3.6+ (社区反馈3.8.0不支持, 但是3.8.2支持)如果用python2的pip安装,会安装本库的老版本0.2.3;如果用python3.5的pip安装,会安装本库的老版本0.3.3;两者均已经不会再维护;PYPI上的最近版本是这个:https://pypi.org/project/uiautomator2/
一.环境搭建:
adb connect ip:port genymotion 默认端口5555,ip为安卓机器ip)这里我以wifi连接为案例:实际usb,wifi,自己决定
python -m uiautomator2 init
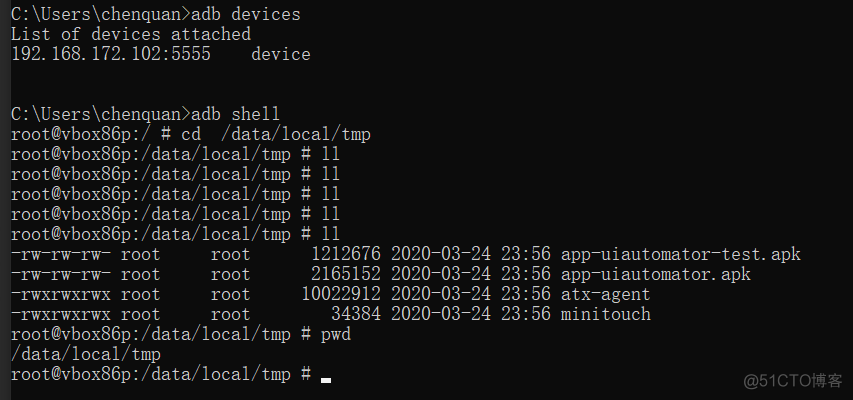
先准备一台(不要两台)开启了开发者选项的安卓手机,连接上电脑,确保执行adb devices可以看到连接上的设备。
运行pip3 install -U uiautomator2安装uiautomator2
运行python3 -m uiautomator2 init安装包含httprpc服务的apk到手机+atx-agent, minicap, minitouch(在过去的版本中,这一步是必须执行的,但是从1.3.0之后的版本,当运行python代码u2.connect()时就会自动推送这些文件了)
命令行运行python打开python交互窗口。然后将下面的命令输入到窗口中。
import uiautomator2 as u2

d = u2.connect() # connect to device
print(d.info)
这时看到类似下面的输出,就可以正式开始用我们这个库了。因为这个库功能太多,后面还有很多的内容,需要慢慢去看 ....
{'currentPackageName': 'net.oneplus.launcher', 'displayHeight': 1920, 'displayRotation': 0, 'displaySizeDpX': 411, 'displaySizeDpY': 731, 'displayWidth': 1080, 'productName': 'OnePlus5', '
screenOn': True, 'sdkInt': 27, 'naturalOrientation': True}
二.示范代码:
import uiautomator2 as u2
"""
https://github.com/openatx/atx-agent/releases
https://github.com/openatx/android-uiautomator-server/releases
https://github.com/openatx/uiautomator2/wiki/Manual-Init
adb shell rm /data/local/tmp/minicap
adb shell rm /data/local/tmp/minicap.so
adb shell rm /data/local/tmp/minitouch
adb shell /data/local/tmp/atx-agent server --stop
adb shell rm /data/local/tmp/atx-agent
adb uninstall com.github.uiautomator
adb uninstall com.github.uiautomator.test
"""
dev=u2.connect("192.168.172.102")
print(dev.info)
调试工具:weditor:
what is weditor ?:用来抓取手机上应用的控件,坐标以及元素属性id,text,description etc;
虽然很想用Android SDK内置工具uiautomatorviewer.bat,但是运行uiautomator2的时候,uiautomatorviewer.bat运行不起来,两者之间冲突太严重。
于是参考着uiautomatorviewer的界面,我又写了一个weditor,调用python-uiautomator2的两个接口screenshot和dump_hierarchy这样就不会有冲突问题了
Install weditor (UI Inspector)
因为uiautomator是独占资源,所以当atx运行的时候uiautomatorviewer是不能用的,为了减少atx频繁的启停,我们开发了基于浏览器技术的weditor UI查看器。https://github.com/openatx/weditor
安装方法(备注: 目前最新的稳定版为 0.1.0)
pip install -U weditor
安装好之后,就可以在命令行运行weditor --help确认是否安装成功了。
Windows系统可以使用命令在桌面创建一个快捷方式
weditor --shortcut
命令行直接输入python -mweditor会自动打开浏览器,输入设备的ip或者序列号,点击Connect即可。
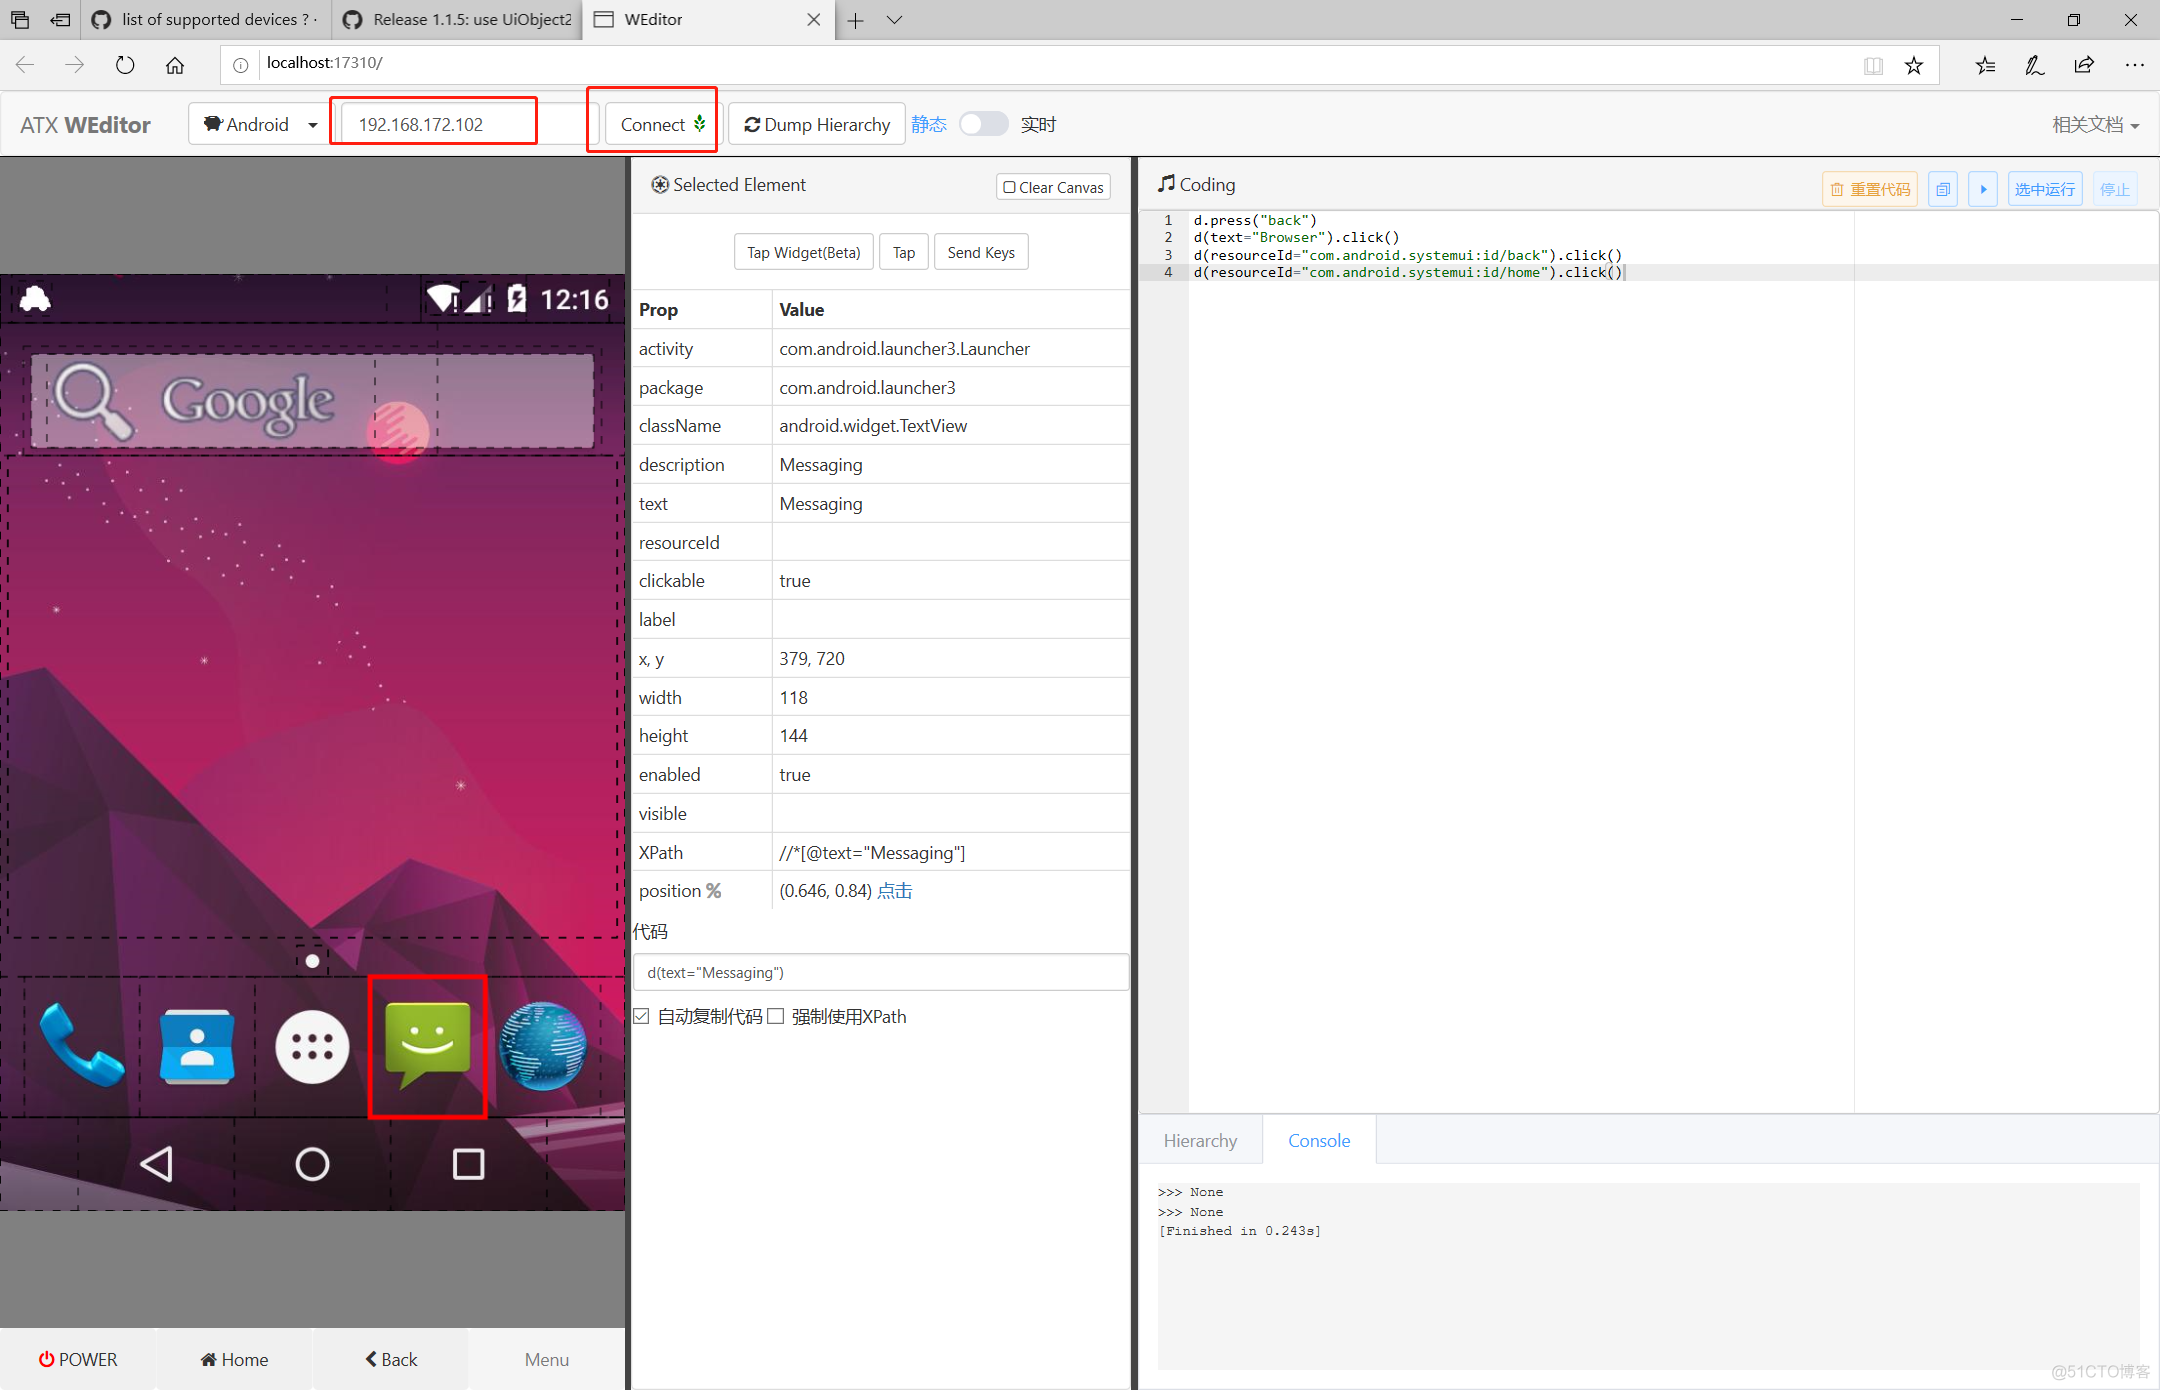
定位方式
ResourceId定位:d(resourceId="com.smartisanos.clock:id/text_stopwatch").click()Text定位d(text="秒表").click()Description定位d(description="..").click()ClassName定位d(className="android.widget.TextView").click()xpath定位并不支持,一开始打算做支持的,但是发现不用也能搞定。就是代码写的长一点而已。
操作控件# click
d(text="Settings").click()
# long click
d(text="Settings").long_click()
# 等待元素的出现
d(text="Settings").wait(timeout=10.0)
九宫格解锁:以前文章写过https://testerhome.com/topics/11034
中文字符的输入
如果可以定位到元素,直接通过set_text就可以输入中文
d(text="Settings").set_text("你好")如果定位不到元素需要使用send_keys方法,以及切换输入法
d.set_fastinput_ime(True)
d.send_keys("你好 Hello")
d.set_fastinput_ime(False) # 输入法用完关掉
截图:d.screenshot("home.jpg")获取图层信息:xml = d.dump_hierarchy()
There are two ways to connect to the device.
Through WiFiSuppose device IP is10.0.0.1and your PC is in the same network.
import uiautomator2 as u2Through USB
d = u2.connect('10.0.0.1') # alias for u2.connect_wifi('10.0.0.1')
print(d.info)
Suppose the device serial is123456f(seen fromadb devices)
import uiautomator2 as u2Through ADB WiFi
d = u2.connect('123456f') # alias for u2.connect_usb('123456f')
print(d.info)
import uiautomator2 as u2

d = u2.connect_adb_wifi("10.0.0.1:5555")

# Equals to
# + Shell: adb connect 10.0.0.1:5555
# + Python: u2.connect_usb("10.0.0.1:5555")
Callingu2.connect()with no argument,uiautomator2will obtain device IP from the environment variableANDROID_DEVICE_IPorANDROID_SERIAL. If this environment variable is empty, uiautomator will fall back toconnect_usband you need to make sure that there is only one device connected to the computer.
其中的$device_ip代表设备的ip地址
如需指定设备需要传入--serial如python3 -m uiautomator2 --serial bff1234 <SubCommand>, SubCommand为子命令(init,或者screenshot等)
screenshot: 截图1.0.3 Added:
python3 -m uiautomator2可以简写为uiautomator2
$ uiautomator2 screenshot screenshot.jpgcurrent: 获取当前包名和activity
$ uiautomator2 currentuninstall: 卸载
{
"package": "com.android.browser",
"activity": "com.uc.browser.InnerUCMobile",
"pid": 28478
}
$ uiautomator2 uninstall <package-name> # 卸载一个包stop: 停止应用
$ uiautomator2 uninstall <package-name-1> <package-name-2> # 卸载多个包
$ uiautomator2 uninstall --all # 全部卸载
$ uiautomator2 stop com.example.app # 停止一个appinstall: 安装apk,apk通过URL给出 (暂时不能用)healthcheck: 健康检查 (暂不能用)
$ uiautomator2 stop --all # 停止所有的app
还有太多太多的操作,我就不写了。更多更详细的API接口文档,直接去Github上看文档吧, 记得留下你的Starhttps://github.com/openatx/uiautomator2
文章最后送上一个网易云音乐的demo:
# coding=utf-8
import uiautomator2 as u2
import time

d = u2.connect('emulator-5554')
d.wait_timeout=20 # setting wait implicit_wait time
print(d.info)
d.app_clear("com.netease.cloudmusic")
d(text="网易云音乐").click()  # d.app_start/stop("com.netease.cloudmusic")
d(resourceId="com.netease.cloudmusic:id/agree").click()
time.sleep(8)
d(resourceId="com.netease.cloudmusic:id/agreeCheckbox").click()
d(resourceId="com.netease.cloudmusic:id/login").click()
d.send_keys("18676741234", clear=True)
d(resourceId="com.netease.cloudmusic:id/next").click()
time.sleep(3)
d.send_keys("yourpassword", clear=True)
d(resourceId="com.netease.cloudmusic:id/login").click()
time.sleep(5)
d(description="搜索").click()
d(resourceId="com.netease.cloudmusic:id/search_src_text").click()
d.send_keys("虚拟", clear=True)
d(text="虚拟青钢影").click()
d(resourceId="com.netease.cloudmusic:id/songName", text='Camille,the Steel Shadow ("青钢影 卡蜜尔"主题曲)').click()
d(resourceId="com.netease.cloudmusic:id/playBtn").click()
d(description="转到上一层级").click()
d(resourceId="com.netease.cloudmusic:id/search_src_text").click()
d.send_keys("虚拟", clear=True)
d(resourceId="com.netease.cloudmusic:id/songInfoContainer").click()
d(resourceId="com.netease.cloudmusic:id/songName", text="丢了你(抖音版)(翻自 井胧)").click()
time.sleep(20)
d.app_clear("com.netease.cloudmusic")


.png)

.png)

