 云计算服务
云计算服务
 服务器租用
服务器租用
 DDOS 防护
 虚拟主机
虚拟主机
 域名服务
域名服务
 基础设施
基础设施
 关于我们
关于我们
由于自己的数据比较少,因此想采用数据增强的方式来扩充自己的数据集,对于目标检测任务而言,除了需要改变原始图像外,还需要对目标框进行相应的变化。
复刻YOLO官方的数据增强实现在YOLOv5的datasets.py中,封装了一系列数据增强的方法。于是我想把它提取出来,单独在外面进行数据增强。我主要想做一些简单的数据增强,比如平移、旋转、缩放等,于是我找到了random_perspective这个函数。

该函数同时将中心平移(Center)、透视变换(Perspective)、旋转(Rotation)、缩放(Scale)、错切(Shear)、Translation(平移)封装在一起,为了计算的方便,大量使用了矩阵乘法来进行变换,理解起来并不容易。
def random_perspective(img, targets=(), segments=(), degrees=10, translate=.1, scale=.1, shear=10, perspective=0.0, border=(0, 0)):
    # torchvision.transforms.RandomAffine(degrees=(-10, 10), translate=(.1, .1), scale=(.9, 1.1), shear=(-10, 10))
    # targets = [cls, xyxy]

    height = img.shape[0] + border[0] * 2  # shape(h,w,c)
    width = img.shape[1] + border[1] * 2

    # Center
    C = np.eye(3)
    C[0, 2] = -img.shape[1] / 2  # x translation (pixels)
    C[1, 2] = -img.shape[0] / 2  # y translation (pixels)

    # Perspective
    P = np.eye(3)
    P[2, 0] = random.uniform(-perspective, perspective)  # x perspective (about y)
    P[2, 1] = random.uniform(-perspective, perspective)  # y perspective (about x)

    # Rotation and Scale
    R = np.eye(3)
    a = random.uniform(-degrees, degrees)
    # a += random.choice([-180, -90, 0, 90])  # add 90deg rotations to small rotations
    s = random.uniform(1 - scale, 1 + scale)
    # s = 2 ** random.uniform(-scale, scale)
    R[:2] = cv2.getRotationMatrix2D(angle=a, center=(0, 0), scale=s)

    # Shear
    S = np.eye(3)
    S[0, 1] = math.tan(random.uniform(-shear, shear) * math.pi / 180)  # x shear (deg)
    S[1, 0] = math.tan(random.uniform(-shear, shear) * math.pi / 180)  # y shear (deg)

    # Translation
    T = np.eye(3)
    T[0, 2] = random.uniform(0.5 - translate, 0.5 + translate) * width  # x translation (pixels)
    T[1, 2] = random.uniform(0.5 - translate, 0.5 + translate) * height  # y translation (pixels)

    # Combined rotation matrix
    M = T @ S @ R @ P @ C  # order of operations (right to left) is IMPORTANT
    if (border[0] != 0) or (border[1] != 0) or (M != np.eye(3)).any():  # image changed
        if perspective:
            img = cv2.warpPerspective(img, M, dsize=(width, height), borderValue=(114, 114, 114))
        else:  # affine
            img = cv2.warpAffine(img, M[:2], dsize=(width, height), borderValue=(114, 114, 114))

    # Visualize
    # import matplotlib.pyplot as plt
    # ax = plt.subplots(1, 2, figsize=(12, 6))[1].ravel()
    # ax[0].imshow(img[:, :, ::-1])  # base
    # ax[1].imshow(img2[:, :, ::-1])  # warped

    # Transform label coordinates
    n = len(targets)
    if n:
        use_segments = any(x.any() for x in segments)
        new = np.zeros((n, 4))
        if use_segments:  # warp segments
            segments = resample_segments(segments)  # upsample
            for i, segment in enumerate(segments):
                xy = np.ones((len(segment), 3))
                xy[:, :2] = segment
                xy = xy @ M.T  # transform
                xy = xy[:, :2] / xy[:, 2:3] if perspective else xy[:, :2]  # perspective rescale or affine

                # clip
                new[i] = segment2box(xy, width, height)

        else:  # warp boxes
            xy = np.ones((n * 4, 3))
            xy[:, :2] = targets[:, [1, 2, 3, 4, 1, 4, 3, 2]].reshape(n * 4, 2)  # x1y1, x2y2, x1y2, x2y1
            xy = xy @ M.T  # transform
            xy = (xy[:, :2] / xy[:, 2:3] if perspective else xy[:, :2]).reshape(n, 8)  # perspective rescale or affine

            # create new boxes
            x = xy[:, [0, 2, 4, 6]]
            y = xy[:, [1, 3, 5, 7]]
            new = np.concatenate((x.min(1), y.min(1), x.max(1), y.max(1))).reshape(4, n).T

            # clip
            new[:, [0, 2]] = new[:, [0, 2]].clip(0, width)
            new[:, [1, 3]] = new[:, [1, 3]].clip(0, height)

        # filter candidates
        i = box_candidates(box1=targets[:, 1:5].T * s, box2=new.T, area_thr=0.01 if use_segments else 0.10)
        targets = targets[i]
        targets[:, 1:5] = new[i]

    return img,
于是我将其照搬下来,改造其输入输出:
import random
import xml.dom.minidom
import cv2
import os
import numpy as np
import math
import xml.etree.ElementTree as ET

# 定义待批量裁剪图像的路径地址
IMAGE_INPUT_PATH = 'VOCdevkit_Origin/VOC2007/JPEGImages'
XML_INPUT_PATH = 'VOCdevkit_Origin/VOC2007/Annotations'
# 定义裁剪后的图像存放地址
IMAGE_OUTPUT_PATH = 'VOCdevkit_Origin/VOC2007/JPEGImages2'
XML_OUTPUT_PATH = 'VOCdevkit_Origin/VOC2007/Annotations2'
imglist = os.listdir(IMAGE_INPUT_PATH)
xmllist = os.listdir(XML_INPUT_PATH)

classes = ['aeroplane', 'bicycle', 'bird', 'boat', 'bottle', 'bus', 'car', 'cat', 'chair', 'cow', 'diningtable', 'dog',
           'horse', 'motorbike', 'person', 'pottedplant', 'sheep', 'sofa', 'train', 'tvmonitor']


def box_candidates(box1, box2, wh_thr=2, ar_thr=20, area_thr=0.1, eps=1e-16):  # box1(4,n), box2(4,n)
    # Compute candidate boxes: box1 before augment, box2 after augment, wh_thr (pixels), aspect_ratio_thr, area_ratio
    w1, h1 = box1[2] - box1[0], box1[3] - box1[1]
    w2, h2 = box2[2] - box2[0], box2[3] - box2[1]
    ar = np.maximum(w2 / (h2 + eps), h2 / (w2 + eps))  # aspect ratio
    return (w2 > wh_thr) & (h2 > wh_thr) & (w2 * h2 / (w1 * h1 + eps) > area_thr) & (ar < ar_thr)  # candidates


for i in range(len(imglist)):
    # 每个图像全路径
    image_input_fullname = IMAGE_INPUT_PATH + '/' + imglist[i]
    xml_input_fullname = XML_INPUT_PATH + '/' + xmllist[i]
    image_output_fullname = IMAGE_OUTPUT_PATH + '/' + imglist[i]
    xml_output_fullname = XML_OUTPUT_PATH + '/' + xmllist[i]

    img = cv2.imread(image_input_fullname)
    # height, width = img.shape[:2]

    border = (0, 0)
    height = img.shape[0] + border[0] * 2  # shape(h,w,c)
    width = img.shape[1] + border[1] * 2

    shear = 10
    degrees = 10
    scale = .1
    perspective = 0.0
    translate = .1

    # Center
    C = np.eye(3)
    C[0, 2] = -img.shape[1] / 2  # x translation (pixels)
    C[1, 2] = -img.shape[0] / 2  # y translation (pixels)

    # Perspective
    P = np.eye(3)
    P[2, 0] = random.uniform(-perspective, perspective)  # x perspective (about y)
    P[2, 1] = random.uniform(-perspective, perspective)  # y perspective (about x)

    # Rotation and Scale
    R = np.eye(3)
    a = random.uniform(-degrees, degrees)
    # a += random.choice([-180, -90, 0, 90])  # add 90deg rotations to small rotations
    s = random.uniform(1 - scale, 1 + scale)
    # s = 2 ** random.uniform(-scale, scale)
    R[:2] = cv2.getRotationMatrix2D(angle=a, center=(0, 0), scale=s)

    # Shear
    S = np.eye(3)
    S[0, 1] = math.tan(random.uniform(-shear, shear) * math.pi / 180)  # x shear (deg)
    S[1, 0] = math.tan(random.uniform(-shear, shear) * math.pi / 180)  # y shear (deg)

    # Translation
    T = np.eye(3)
    T[0, 2] = random.uniform(0.5 - translate, 0.5 + translate) * width  # x translation (pixels)
    T[1, 2] = random.uniform(0.5 - translate, 0.5 + translate) * height  # y translation (pixels)


    M = T @ S @ R @ P @ C  # order of operations (right to left) is IMPORTANT

    img2 = cv2.warpAffine(img, M[:2], dsize=(width, height), borderValue=(114, 114, 114))

    # 查看旋转前后效果对比
    # ax = plt.subplots(1, 2, figsize=(12, 6))[1].ravel()
    # ax[0].imshow(img[:, :, ::-1])  # base
    # ax[1].imshow(img2[:, :, ::-1])  # warped
    # plt.show()

    tree = ET.parse(xml_input_fullname)
    root = tree.getroot()

    # 读取标注目标框
    dom = xml.dom.minidom.parse(xml_input_fullname)
    root2 = dom.documentElement
    objects = root2.getElementsByTagName("bndbox")
    n = len(objects)

    targets = np.zeros((n, 5))
    # target[:, 1] = int(target[:, 1])
    # target = target.astype(int)
    # target = target.astype(float)
    # print(target)
    for index, obj in enumerate(root.iter('object')):
        difficult = obj.find('difficult').text
        cls = obj.find('name').text
        if cls not in classes or int(difficult) == 1:
            continue
        cls_id = classes.index(cls)
        xmlbox = obj.find('bndbox')
        b = (float(xmlbox.find('xmin').text), float(xmlbox.find('xmax').text), float(xmlbox.find('ymin').text),
             float(xmlbox.find('ymax').text))
        targets[index, 0] = cls_id
        targets[index, 1:] = b

    # print(target)
    # print(target_list)
    # print("---")

    new = np.zeros((n, 4))  # [n, 0+0+0+0]
    # 直接对box透视/仿射变换
    # 由于有旋转,透视变换等操作,所以需要对四个角点都进行变换
    xy = np.ones((n * 4, 3))
    xy[:, :2] = targets[:, [1, 2, 3, 4, 1, 4, 3, 2]].reshape(n * 4, 2)  # x1y1, x2y2, x1y2, x2y1
    # print(xy)
    xy = xy @ M.T  # transform 每个角点的坐标
    xy = xy[:, :2].reshape(n, 8)
    # create new boxes
    x = xy[:, [0, 2, 4, 6]]
    y = xy[:, [1, 3, 5, 7]]
    new = np.concatenate((x.min(1), y.min(1), x.max(1), y.max(1))).reshape(4, n).T

    # clip  去除太小的target(target大部分跑到图外去了)
    new[:, [0, 2]] = new[:, [0, 2]].clip(0, width)
    new[:, [1, 3]] = new[:, [1, 3]].clip(0, height)

    # filter candidates
    i = box_candidates(box1=targets[:, 1:5].T * s, box2=new.T, area_thr= 0.10)
    targets = targets[i]
    targets[:, 1:5] = new[i]

    # print(targets)

    for obj in targets:
        # print(obj)
        # xmin, ymin, xmax, ymax分别为xml读取的坐标信息
        left_top = (int(obj[1]), int(obj[2]))
        right_down = (int(obj[3]), int(obj[4]))
        cv2.rectangle(img2, left_top, right_down, (255, 0, 0), 1)

    cv2.imwrite(image_output_fullname, img2)
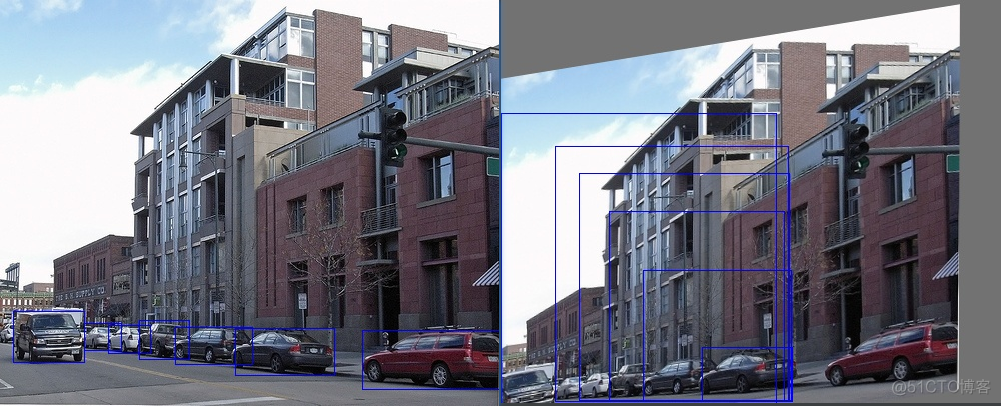
然而结果一言难尽,图像成功进行了变换,然而目标框似乎出现了错位。下图中,左侧为原始图像,右侧为变换之后的图像。
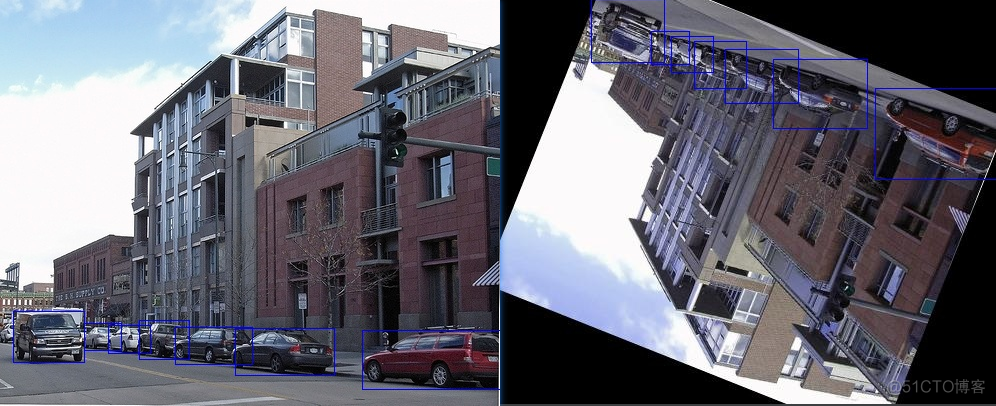
于是我打算另辟蹊径,找到了Imgaug这个工具包。
官方网址:https://imgaug.readthedocs.io/en/latest/source/examples_bounding_boxes.html
这个库好用之处在于不仅对各种图像增强方式进行了封装,并且目标框的变换也只需通过非常简单的代码就能实现。
下面的代码中,我主要设置了翻转/颜色变换/仿射变换(缩放、平移、旋转),更多数据增强方式可以看上面的链接。
import xml.etree.ElementTree as ET
import pickle
import os
from os import getcwd
import numpy as np
from PIL import Image
import imgaug as ia
from imgaug import augmenters as iaa

ia.seed(1)


# 读取出图像中的目标框
def read_xml_annotation(root, image_id):
    in_file = open(os.path.join(root, image_id))
    tree = ET.parse(in_file)
    root = tree.getroot()
    bndboxlist = []

    for object in root.findall('object'):  # 找到root节点下的所有country节点
        bndbox = object.find('bndbox')  # 子节点下节点rank的值

        xmin = int(bndbox.find('xmin').text)
        xmax = int(bndbox.find('xmax').text)
        ymin = int(bndbox.find('ymin').text)
        ymax = int(bndbox.find('ymax').text)
        # print(xmin,ymin,xmax,ymax)
        bndboxlist.append([xmin, ymin, xmax, ymax])
        # print(bndboxlist)

    return bndboxlist  # 以多维数组的形式保存


def change_xml_annotation(root, image_id, new_target):
    new_xmin = new_target[0]
    new_ymin = new_target[1]
    new_xmax = new_target[2]
    new_ymax = new_target[3]

    in_file = open(os.path.join(root, str(image_id) + '.xml'))
    tree = ET.parse(in_file)
    xmlroot = tree.getroot()
    object = xmlroot.find('object')
    bndbox = object.find('bndbox')
    xmin = bndbox.find('xmin')
    xmin.text = str(new_xmin)
    ymin = bndbox.find('ymin')
    ymin.text = str(new_ymin)
    xmax = bndbox.find('xmax')
    xmax.text = str(new_xmax)
    ymax = bndbox.find('ymax')
    ymax.text = str(new_ymax)
    tree.write(os.path.join(root, str(image_id) + "_aug" + '.xml'))


def change_xml_list_annotation(root, image_id, new_target, saveroot, id):
    in_file = open(os.path.join(root, str(image_id) + '.xml'))  # 读取原来的xml文件
    tree = ET.parse(in_file)  # 读取xml文件
    xmlroot = tree.getroot()
    index = 0
    # 将bbox中原来的坐标值换成新生成的坐标值
    for object in xmlroot.findall('object'):  # 找到root节点下的所有country节点
        bndbox = object.find('bndbox')  # 子节点下节点rank的值

        # 注意new_target原本保存为高维数组
        new_xmin = new_target[index][0]
        new_ymin = new_target[index][1]
        new_xmax = new_target[index][2]
        new_ymax = new_target[index][3]

        xmin = bndbox.find('xmin')
        xmin.text = str(new_xmin)
        ymin = bndbox.find('ymin')
        ymin.text = str(new_ymin)
        xmax = bndbox.find('xmax')
        xmax.text = str(new_xmax)
        ymax = bndbox.find('ymax')
        ymax.text = str(new_ymax)

        index = index + 1

    tree.write(os.path.join(saveroot, str(image_id) + "_aug_" + str(id) + '.xml'))
    # tree.write(os.path.join(saveroot, str(image_id) + "_baseaug_" + '.xml'))


# 处理文件
def mkdir(path):
    # 去除首位空格
    path = path.strip()
    # 去除尾部 \ 符号
    path = path.rstrip("\\")
    # 判断路径是否存在
    # 存在     True
    # 不存在   False
    isExists = os.path.exists(path)
    # 判断结果
    if not isExists:
        # 如果不存在则创建目录
        # 创建目录操作函数
        os.makedirs(path)
        print(path + ' 创建成功')
        return True
    else:
        # 如果目录存在则不创建,并提示目录已存在
        print(path + ' 目录已存在')
        return False


if __name__ == "__main__":

    IMG_DIR = r"C:\Users\xy\Desktop\Augmentation\VOC2007\JPEGImages"
    XML_DIR = r"C:\Users\xy\Desktop\Augmentation\VOC2007\Annotations"

    # 存储增强后的影像文件夹路径
    AUG_IMG_DIR = r"C:\Users\xy\Desktop\Augmentation\VOC2007\JPEGImages_after"
    mkdir(AUG_IMG_DIR)
    # 存储增强后的XML文件夹路径
    AUG_XML_DIR = r"C:\Users\xy\Desktop\Augmentation\VOC2007\Annotations_after"
    mkdir(AUG_XML_DIR)

    AUGLOOP = 2  # 每张影像增强的数量

    boxes_img_aug_list = []
    new_bndbox = []
    new_bndbox_list = []

    # 影像增强
    seq = iaa.Sequential([
        iaa.Flipud(0.5),  # 对50%的图像做上下翻转
        iaa.Fliplr(0.5),  # 对50%的图像做左右翻转
        # iaa.Multiply((1.2, 1.5)),  # 像素乘上1.2或者1.5之间的数字
        # iaa.GaussianBlur(sigma=(0, 3.0)),  # 使用高斯模糊
        iaa.WithColorspace(to_colorspace="HSV", from_colorspace="RGB",
                           children=iaa.WithChannels(0, iaa.Add(10))),  # 先将图片从RGB变换到HSV,然后将H值增加10,然后再变换回RGB。
        iaa.Affine(
            # translate_px={"x": 15, "y": 15},  # 平移
            scale=(0.8, 0.95),  # 图像缩放为80%到95%之间
            rotate=(-30, 30)  # 旋转±30度之间
        )  # 仿射变换
    ])

    # 得到当前运行的目录和目录当中的文件,其中sub_folders可以为空
    for root, sub_folders, files in os.walk(XML_DIR):
        # 遍历每一张图片
        for name in files:
            bndbox = read_xml_annotation(XML_DIR, name)
            for epoch in range(AUGLOOP):
                seq_det = seq.to_deterministic()  # 固定变换序列,之后就可以先变换图像然后变换关键点,这样可以保证两次的变换完全相同

                # 读取图片
                img = Image.open(os.path.join(IMG_DIR, name[:-4] + '.jpg'))
                img = np.array(img)

                # bndbox 坐标增强,依次处理所有的bbox
                for i in range(len(bndbox)):
                    bbs = ia.BoundingBoxesOnImage([
                        ia.BoundingBox(x1=bndbox[i][0], y1=bndbox[i][1], x2=bndbox[i][2], y2=bndbox[i][3]),
                    ], shape=img.shape)

                    bbs_aug = seq_det.augment_bounding_boxes([bbs])[0]
                    boxes_img_aug_list.append(bbs_aug)

                    # new_bndbox_list:[[x1,y1,x2,y2],...[],[]]
                    new_bndbox_list.append([int(bbs_aug.bounding_boxes[0].x1),
                                            int(bbs_aug.bounding_boxes[0].y1),
                                            int(bbs_aug.bounding_boxes[0].x2),
                                            int(bbs_aug.bounding_boxes[0].y2)])
                # 存储变化后的图片
                image_aug = seq_det.augment_images([img])[0]
                path = os.path.join(AUG_IMG_DIR, str(name[:-4]) + "_aug_" + str(epoch) + '.jpg')
                # path = os.path.join(AUG_IMG_DIR, str(name[:-4]) + "_baseaug_" + '.jpg')
                # image_auged = bbs.draw_on_image(image_aug, thickness=0)
                Image.fromarray(image_aug).save(path)

                # 存储变化后的XML
                change_xml_list_annotation(XML_DIR, name[:-4], new_bndbox_list, AUG_XML_DIR, epoch)
                # print(str(name[:-4]) + "_aug_" + str(epoch) + '.jpg')
                new_bndbox_list = []
可以看到,结果非常不错。
在思考采用旋转数据增强时,我想到了一个问题,就是旋转之后的目标框实际上是要比原先要大的。采用这位博主所画的图可以进行解释。
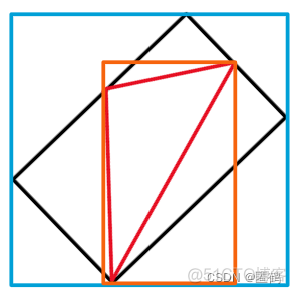
橙色框是原本目标的边界框,旋转后,黑色框为理想的目标框,但是在YOLO中只能处理方正的边界框,因此会用蓝色框进行替代,这样就导致了目标框松垮的问题。因此,旋转增强应当采用小角度,尽量避免接45°。
数据增强提升经验我尚未使用数据增强进行对比测试,看到这位博主已经进行了测试,各方法提升结果如下:
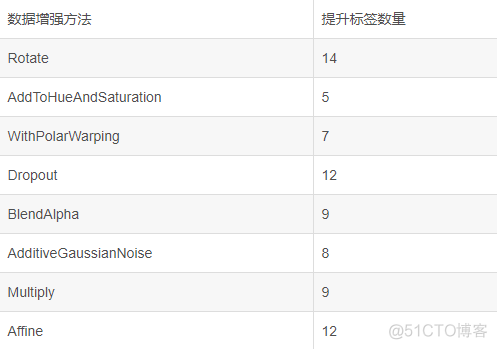
结论是使用旋转(Rotate)、随机去除像素点(Dropout)、仿射变换(Affine)对结果的提升比较显著,后续可优先使用这三种方法。
完整代码完整代码和测试图片放在了我的Github上:
https://github.com/zstar1003/example_for_data_augmentation
2022.8.13更
之前对YOLOv5官方实现的数据增强变化不太理解。看到https://github.com/datawhalechina/magic-cv这个项目里有一个表格,感觉豁然开朗,摘录如下:
仿射变换矩阵:
其中,
表示输出图像像素的坐标,
,
表示输入图像像素的坐标
变换名称
平移
1
0
0
1
均匀缩放
0
0
0
0
不均匀缩放
0
0
0
0
顺时针旋转角度
0
0
逆时针旋转角度
0
0
垂直偏移变换
1
0
0
h
1
0
水平偏移变换
1
h
0
0
1
0


.png)

.png)

