 云计算服务
云计算服务
 服务器租用
服务器租用
 DDOS 防护
 虚拟主机
虚拟主机
 域名服务
域名服务
 基础设施
基础设施
 关于我们
关于我们
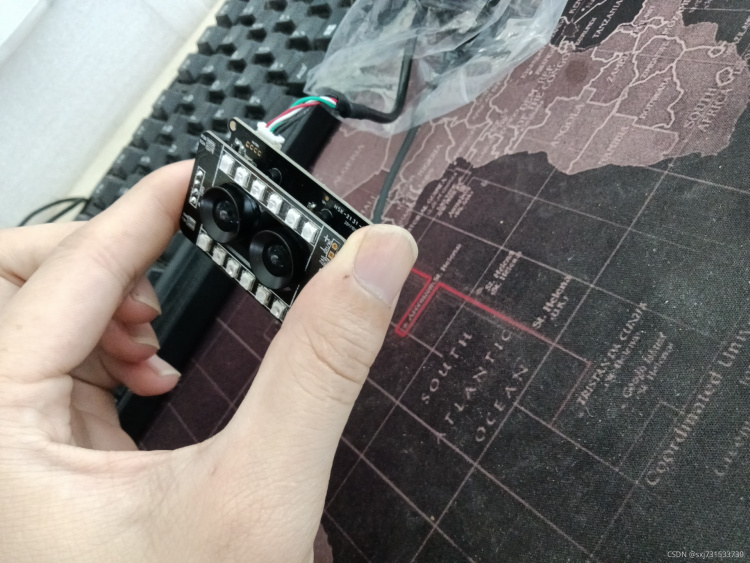
基本思想:因为最近用到了双目摄像头测距的代码逻辑,逐记录和转发一下大佬们的知识点,本菜鸡使用的深圳市鸿市康科技有限公司的双目摄像头进行测试

本测试需要使用pycharm和Matlab软件
链接:https://pan.baidu.com/s/1hCpEQfeQyI326XTrQQ5ayA
提取码:gwih
双目测距的整体原理是根据相似三角形原理进行计算和求距离
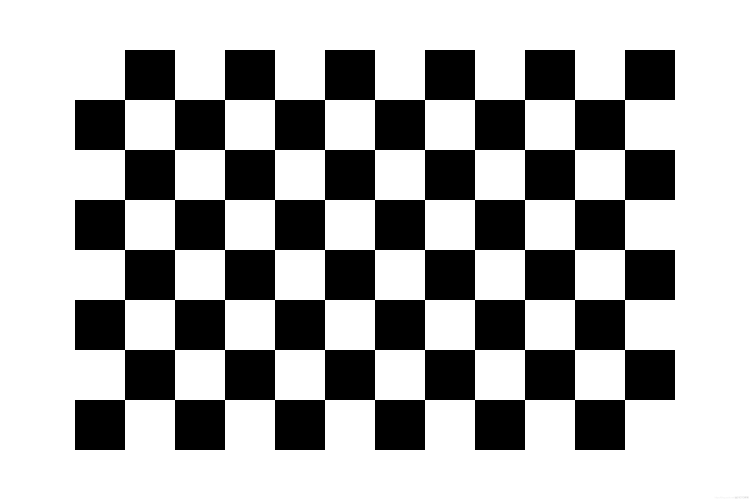
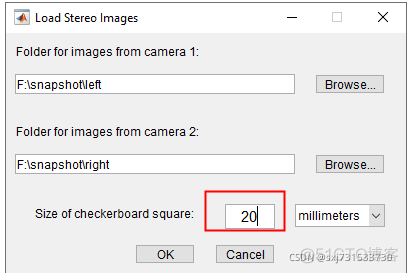
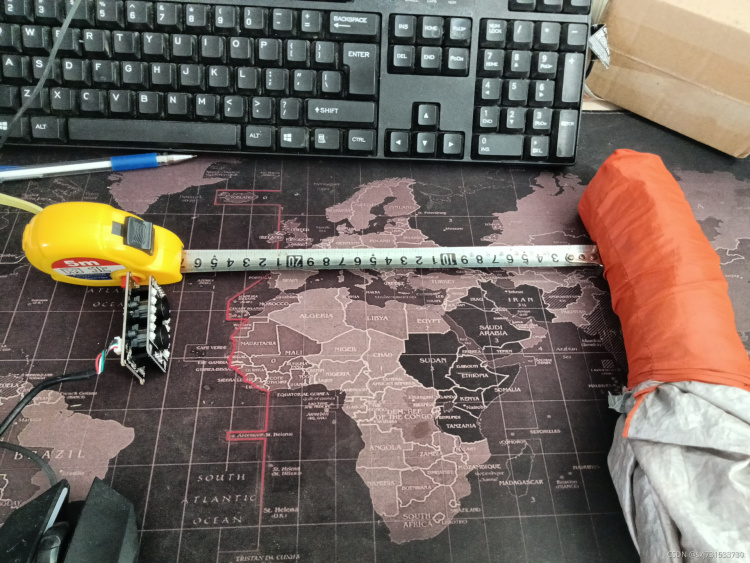
本人打印出来的是一个表格1厘米=10mm (本图片20mm)
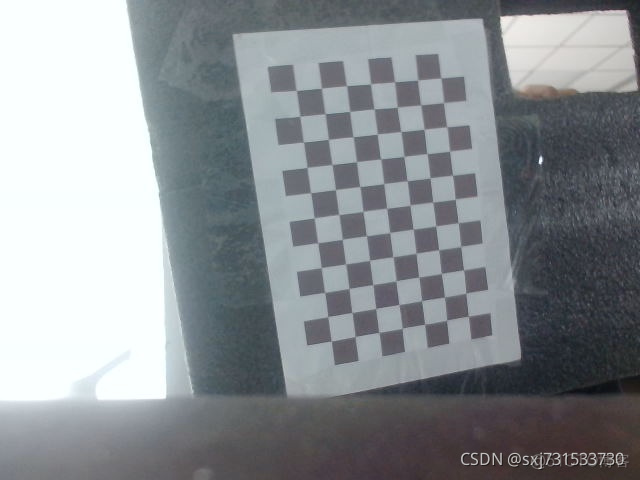
首先使用两个相机进行标注数据的采集
使用代码进行数据采集双目测距代码 python opencv 利用双目摄像头拍照,测距_xiao__run的博客-CSDN博客_双目摄像头测距代码
#!/usr/bin/python
# -*- coding: utf-8 -*-
import cv2
import time
import os
AUTO = True  # 自动拍照,或手动按s键拍照
INTERVAL = 2  # 自动拍照间隔

cv2.namedWindow("left")
cv2.namedWindow("right")
cv2.moveWindow("left", 0, 0)
cv2.moveWindow("right", 400, 0)
left_camera = cv2.VideoCapture(0)
# cv2.waitKey(50)
# left_camera.set(cv2.CV_CAP_PROP_FRAME_WIDTH,320)
# left_camera.set(cv2.CV_CAP_PROP_FRAME_HEIGHT,240)
right_camera = cv2.VideoCapture(2)
# right_camera.set(cv2.CV_CAP_PROP_FRAME_WIDTH,320)
# right_camera.set(cv2.CV_CAP_PROP_FRAME_HEIGHT,240)

counter = 0
utc = time.time()
pattern = (12, 8)  # 棋盘格尺寸
leftfolder = "F:\\snapshot\\left\\"  # 拍照文件目录
rightfolder = "F:\\snapshot\\right\\"  # 拍照文件目录

if not os.path.isdir(leftfolder):
   os.makedirs(leftfolder)
if not os.path.isdir(rightfolder):
   os.makedirs(rightfolder)

def shot(pos, frame):
    global counter
    if pos == "left":
        path = leftfolder + pos + "_" + str(counter) + ".jpg"
    else:
        path = rightfolder + pos + "_" + str(counter) + ".jpg"
    cv2.imwrite(path, frame)
    print("snapshot saved into: " + path)


while True:
    ret, left_frame = left_camera.read()
    ret, right_frame = right_camera.read()

    cv2.imshow("left", left_frame)
    cv2.imshow("right", right_frame)

    now = time.time()
    if AUTO and now - utc >= INTERVAL:
        shot("left", left_frame)
        shot("right", right_frame)
        counter += 1
        utc = now

    key = cv2.waitKey(1)
    if key == ord("q"):
        break
    elif key == ord("s"):
        shot("left", left_frame)
        shot("right", right_frame)
        counter += 1

left_camera.release()
right_camera.release()
cv2.destroyWindow("left")
cv2.destroyWindow("right")
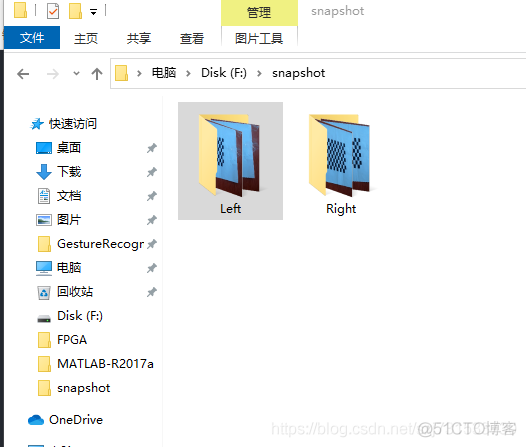
然后采集的图片为
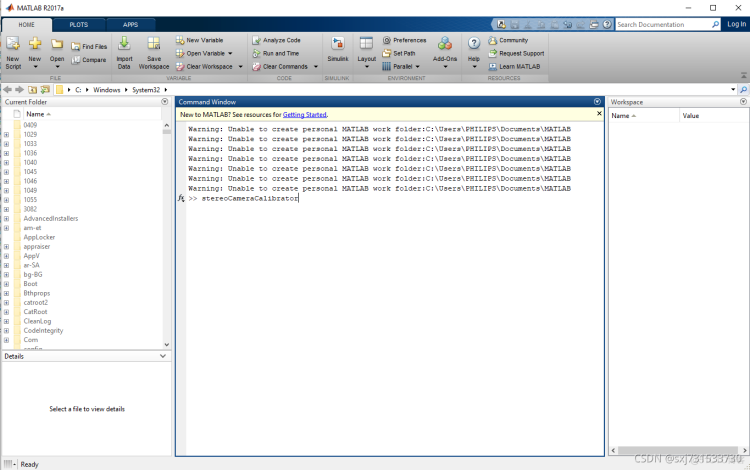
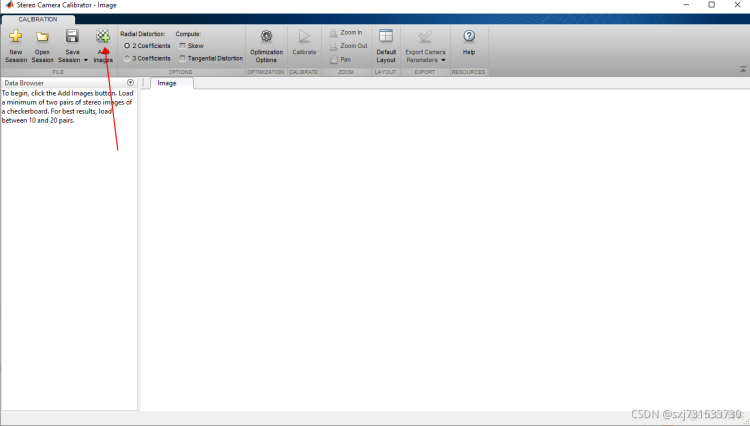
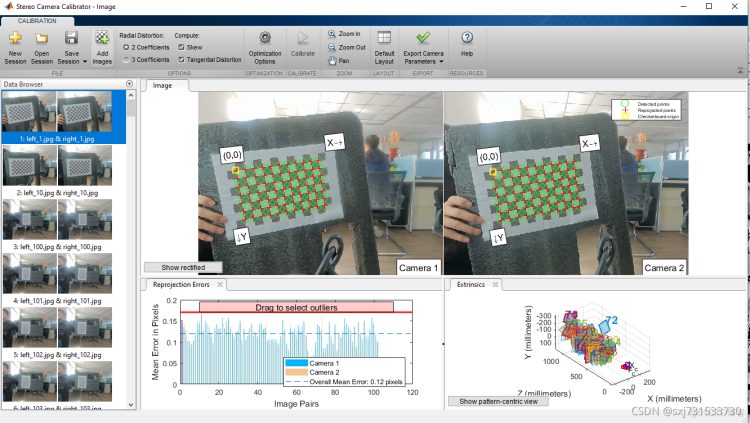
然后下载Matlab,进行安装和标注图片
stereoCameraCalibrator
得到内参数 误差越低越好,可以筛选一遍误差高的数据 踢掉,重新再测
加载图片进行测试
加载图片进行标定
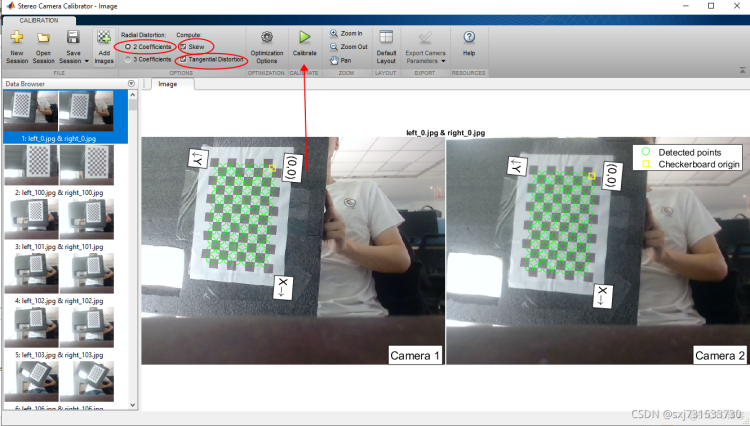
这个地方也可以选择3 coefficients 那样 RadiaDistortion 就是k1 k2 k3 且k3 不为0 ~~~
然后export camera parameters
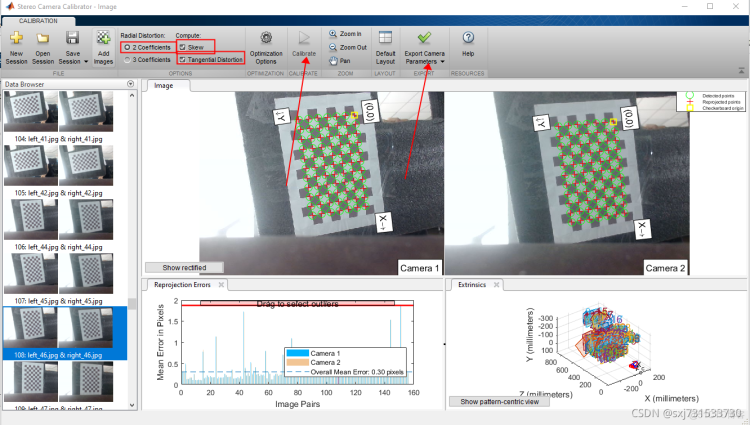
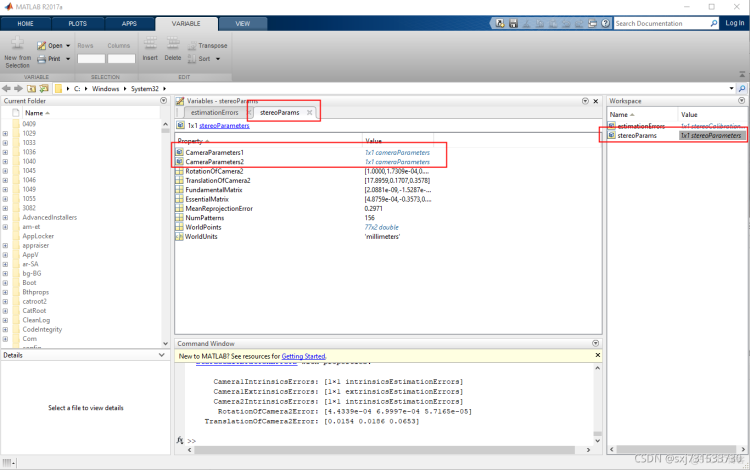
获取相机的内参数和旋转参数
camera_1

camera_1内参数 (需要转置之后的数据)
482.358833055439  0 0
0.143792714636614 482.794702482657  0
319.442979874688  244.304817803559  1
RadialDistortion :[-0.018823786425932,-0.032153708400519,0]  对应 K1,K2  、默认K3为0

TangentialDistortion [-0.004068332542007,0.002017129533930]   对应  P1,P2
使用时,K1,K2,P1,P2,K3顺序
camera_2

camera_2内参数(需要转置之后的数据)
484.096466705133  0 0
-0.0240214766670372 484.091870086517  0
334.989410844149  263.299292119045  1
RadialDistortion :[-0.020529452801129,-0.035017769185771,0]  对应 K1,K2  、 K3默认为0

TangentialDistortion :[-0.003587113972511,0.001782235565256]   对应  P1,P2
使用时,K1,K2,P1,P2,K3顺序

R 矩阵
0.999994804928070 0.000173092327202142  0.00321871960839931
-0.000183280859797446 0.999994973395993 0.00316537373372421
-0.00321815552726439  -0.00316594721907725  0.999989810074687
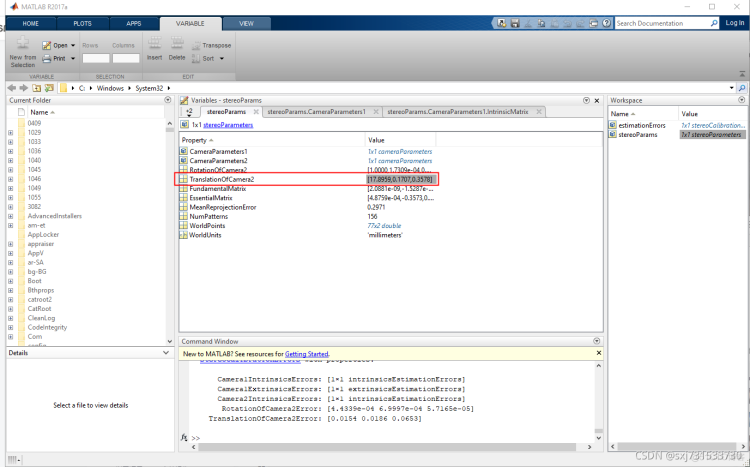
T矩阵
[17.895862114524505,0.170729659518267,0.357839913703126]
测试代码python、opencv 双目视觉测距代码_ilovestudy2的博客-_双目视觉测距代码
# filename: camera_configs.py
import cv2
import numpy as np

# 482.358833055439  0   0
# 0.143792714636614 482.794702482657    0
# 319.442979874688  244.304817803559    1
left_camera_matrix = np.array([[482.358833055439,0.143792714636614,319.442979874688],
                               [0,               482.794702482657, 244.304817803559],
                               [0,               0,                1]])
left_distortion = np.array([[-0.018823786425932,-0.032153708400519, -0.004068332542007,0.002017129533930, 0.00000]])

# 484.096466705133  0   0
# -0.0240214766670372   484.091870086517    0
# 334.989410844149  263.299292119045    1

right_camera_matrix = np.array([[484.096466705133, -0.0240214766670372,334.989410844149],
                                [0,                484.091870086517,   263.299292119045],
                                [0,                0,                   1]])
right_distortion = np.array([[-0.020529452801129,-0.035017769185771,-0.003587113972511,0.001782235565256, 0.00000]])

R = np.matrix([
    [0.999994804928070,0.000173092327202142,0.00321871960839931],
      [- 0.000183280859797446,0.999994973395993,0.00316537373372421] ,
    [ - 0.00321815552726439,- 0.00316594721907725,0.999989810074687]]
)

# print(R)

T = np.array([17.895862114524505,0.170729659518267,0.357839913703126])  # 平移关系向量

size = (640, 480)  # 图像尺寸

# 进行立体更正
R1, R2, P1, P2, Q, validPixROI1, validPixROI2 = cv2.stereoRectify(left_camera_matrix, left_distortion,
                                                                  right_camera_matrix, right_distortion, size, R,
                                                                  T)
# 计算更正map
left_map1, left_map2 = cv2.initUndistortRectifyMap(left_camera_matrix, left_distortion, R1, P1, size, cv2.CV_16SC2)
right_map1, right_map2 = cv2.initUndistortRectifyMap(right_camera_matrix, right_distortion, R2, P2, size, cv2.CV_16SC2)
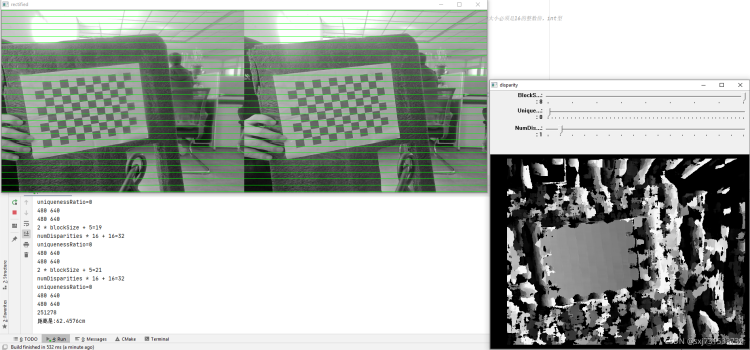
测试代码
# 该脚本实现深度图以及点击深度图测量像素点的真实距离
# 可以运行看到效果之后最好自己重新标定一次
from cv2 import cv2
import numpy as np
import camera_configs # 摄像头的标定数据
cam1 = cv2.VideoCapture(0) # 摄像头的ID不同设备上可能不同
cam2 = cv2.VideoCapture(2) # 摄像头的ID不同设备上可能不同
# cam1 = cv2.VideoCapture(1 + cv2.CAP_DSHOW) # 摄像头的ID不同设备上可能不同
# cam1.set(cv2.CAP_PROP_FRAME_WIDTH, 1280) # 设置双目的宽度
# cam1.set(cv2.CAP_PROP_FRAME_HEIGHT, 480) # 设置双目的高度
# 创建用于显示深度的窗口和调节参数的bar
cv2.namedWindow("depth")
cv2.moveWindow("left", 0, 0)
cv2.moveWindow("right", 600, 0)
# 创建用于显示深度的窗口和调节参数的bar
# cv2.namedWindow("depth")
cv2.namedWindow("config", cv2.WINDOW_NORMAL)
cv2.moveWindow("left", 0, 0)
cv2.moveWindow("right", 600, 0)
cv2.createTrackbar("num", "config", 0, 60, lambda x: None)
cv2.createTrackbar("blockSize", "config", 30, 255, lambda x: None)
cv2.createTrackbar("SpeckleWindowSize", "config", 1, 10, lambda x: None)
cv2.createTrackbar("SpeckleRange", "config", 1, 255, lambda x: None)
cv2.createTrackbar("UniquenessRatio", "config", 1, 255, lambda x: None)
cv2.createTrackbar("TextureThreshold", "config", 1, 255, lambda x: None)
cv2.createTrackbar("UniquenessRatio", "config", 1, 255, lambda x: None)
cv2.createTrackbar("MinDisparity", "config", 0, 255, lambda x: None)
cv2.createTrackbar("PreFilterCap", "config", 1, 65, lambda x: None) # 注意调节的时候这个值必须是奇数
cv2.createTrackbar("MaxDiff", "config", 1, 400, lambda x: None)
# 添加点击事件,打印当前点的距离
def callbackFunc(e, x, y, f, p):
if e == cv2.EVENT_LBUTTONDOWN:
print(threeD[y][x])
if abs(threeD[y][x][2]) < 3000:
print("当前距离:" + str(abs(threeD[y][x][2])))
else:
print("当前距离过大或请点击色块的位置")
cv2.setMouseCallback("depth", callbackFunc, None)
# 初始化计算FPS需要用到参数 注意千万不要用opencv自带fps的函数,那个函数得到的是摄像头最大的FPS
frame_rate_calc = 1
freq = cv2.getTickFrequency()
font = cv2.FONT_HERSHEY_SIMPLEX
imageCount = 1
while True:
t1 = cv2.getTickCount()
ret1, frame1 = cam1.read()
ret1, frame2 = cam2.read()
if not ret1:
print("camera is not connected!")
break
# 这里的左右两个摄像头的图像是连在一起的,所以进行一下分割
# frame1 = frame[0:480, 0:640]
# frame2 = frame[0:480, 640:1280]
####### 深度图测量开始 #######
# 立体匹配这里使用BM算法,
# 根据标定数据对图片进行重构消除图片的畸变
img1_rectified = cv2.remap(frame1, camera_configs.left_map1, camera_configs.left_map2, cv2.INTER_LINEAR,
cv2.BORDER_CONSTANT)
img2_rectified = cv2.remap(frame2, camera_configs.right_map1, camera_configs.right_map2, cv2.INTER_LINEAR,
cv2.BORDER_CONSTANT)
# 如有些版本 remap()的图是反的 这里对角翻转一下
# img1_rectified = cv2.flip(img1_rectified, -1)
# img2_rectified = cv2.flip(img2_rectified, -1)
# 将图片置为灰度图,为StereoBM作准备,BM算法只能计算单通道的图片,即灰度图
# 单通道就是黑白的,一个像素只有一个值如[123],opencv默认的是BGR(注意不是RGB), 如[123,4,134]分别代表这个像素点的蓝绿红的值
imgL = cv2.cvtColor(img1_rectified, cv2.COLOR_BGR2GRAY)
imgR = cv2.cvtColor(img2_rectified, cv2.COLOR_BGR2GRAY)
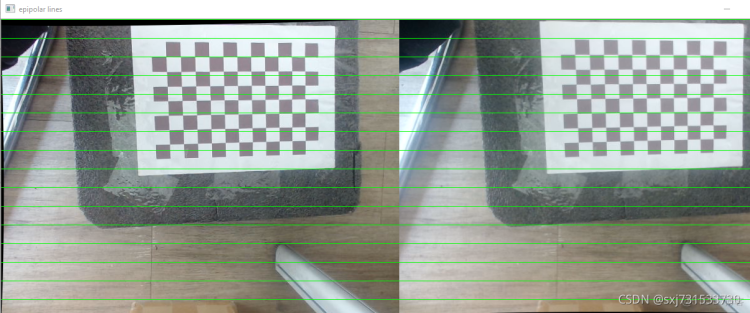
out = np.hstack((img1_rectified, img2_rectified))
for i in range(0, out.shape[0], 30):
cv2.line(out, (0, i), (out.shape[1], i), (0, 255, 0), 1)
cv2.imshow("epipolar lines", out)
# 通过bar来获取到当前的参数
# BM算法对参数非常敏感,一定要耐心调整适合自己摄像头的参数,前两个参数影响大 后面的参数也要调节
num = cv2.getTrackbarPos("num", "config")
SpeckleWindowSize = cv2.getTrackbarPos("SpeckleWindowSize", "config")
SpeckleRange = cv2.getTrackbarPos("SpeckleRange", "config")
blockSize = cv2.getTrackbarPos("blockSize", "config")
UniquenessRatio = cv2.getTrackbarPos("UniquenessRatio", "config")
TextureThreshold = cv2.getTrackbarPos("TextureThreshold", "config")
MinDisparity = cv2.getTrackbarPos("MinDisparity", "config")
PreFilterCap = cv2.getTrackbarPos("PreFilterCap", "config")
MaxDiff = cv2.getTrackbarPos("MaxDiff", "config")
if blockSize % 2 == 0:
blockSize += 1
if blockSize < 5:
blockSize = 5
# 根据BM算法生成深度图的矩阵,也可以使用SGBM,SGBM算法的速度比BM慢,但是比BM的精度高
stereo = cv2.StereoBM_create(
numDisparities=16 * num,
blockSize=blockSize,
)
stereo.setROI1(camera_configs.validPixROI1)
stereo.setROI2(camera_configs.validPixROI2)
stereo.setPreFilterCap(PreFilterCap)
stereo.setMinDisparity(MinDisparity)
stereo.setTextureThreshold(TextureThreshold)
stereo.setUniquenessRatio(UniquenessRatio)
stereo.setSpeckleWindowSize(SpeckleWindowSize)
stereo.setSpeckleRange(SpeckleRange)
stereo.setDisp12MaxDiff(MaxDiff)
# 对深度进行计算,获取深度矩阵
disparity = stereo.compute(imgL, imgR)
# 按照深度矩阵生产深度图
disp = cv2.normalize(disparity, disparity, alpha=0, beta=255, norm_type=cv2.NORM_MINMAX, dtype=cv2.CV_8U)
# 将深度图扩展至三维空间中,其z方向的值则为当前的距离
threeD = cv2.reprojectImageTo3D(disparity.astype(np.float32) / 16., camera_configs.Q)
# 将深度图转为伪色图,这一步对深度测量没有关系,只是好看而已
fakeColorDepth = cv2.applyColorMap(disp, cv2.COLORMAP_JET)
cv2.putText(frame1, "FPS: {0:.2f}".format(frame_rate_calc), (30, 50), font, 1, (255, 255, 0), 2, cv2.LINE_AA)
# 按下S可以保存图片
interrupt = cv2.waitKey(10)
if interrupt & 0xFF == 27: # 按下ESC退出程序
break
if interrupt & 0xFF == ord('s'):
cv2.imwrite('images/left' + '.jpg', frame1)
cv2.imwrite('images/right' + '.jpg', frame2)
cv2.imwrite('images/img1_rectified' + '.jpg', img1_rectified) # 畸变,注意观察正反
cv2.imwrite('images/img2_rectified' + '.jpg', img2_rectified)
cv2.imwrite('images/depth' + '.jpg', disp)
cv2.imwrite('images/fakeColor' + '.jpg', fakeColorDepth)
cv2.imwrite('mages/epipolar' + '.jpg', out)
####### 任务1:测距结束 #######
# 显示
# cv2.imshow("frame", frame) # 原始输出,用于检测左右
cv2.imshow("frame1", frame1) # 左边原始输出
cv2.imshow("frame2", frame2) # 右边原始输出
cv2.imshow("img1_rectified", img1_rectified) # 左边矫正后输出
cv2.imshow("img2_rectified", img2_rectified) # 右边边矫正后输出
cv2.imshow("depth", disp) # 输出深度图及调整的bar
cv2.imshow("fakeColor", fakeColorDepth) # 输出深度图的伪色图,这个图没有用只是好看
# 需要对深度图进行滤波将下面几行开启即可 开启后FPS会降低
img_medianBlur = cv2.medianBlur(disp, 25)
img_medianBlur_fakeColorDepth = cv2.applyColorMap(img_medianBlur, cv2.COLORMAP_JET)
img_GaussianBlur = cv2.GaussianBlur(disp, (7, 7), 0)
img_Blur = cv2.blur(disp, (5, 5))
cv2.imshow("img_GaussianBlur", img_GaussianBlur) # 右边原始输出
cv2.imshow("img_medianBlur_fakeColorDepth", img_medianBlur_fakeColorDepth) # 右边原始输出
cv2.imshow("img_Blur", img_Blur) # 右边原始输出
cv2.imshow("img_medianBlur", img_medianBlur) # 右边原始输出
t2 = cv2.getTickCount()
time1 = (t2 - t1) / freq
frame_rate_calc = 1 / time1
cam1.release()
cv2.destroyAllWindows()
评测一下参数填写是否正确
测试距离还可以
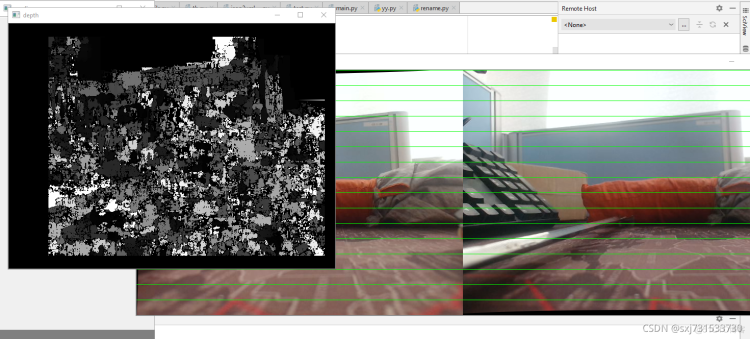
实际测试距离
python 代码输出
"C:\Program Files\Python36\python.exe" F:/sxj/untitled1/tb.py
[-160.34296  -99.20989 -294.24945]
当前距离:294.24945
[2102.2913   961.43726 8653.758  ]
当前距离过大或请点击色块的位置
[ -11.728293  -41.4888   -325.02377 ]
当前距离:325.02377
[  41.895386  -39.675518 -279.15347 ]
当前距离:279.15347
c++测试代码 重新标注新的环境和新摄像头

matlab标注代码
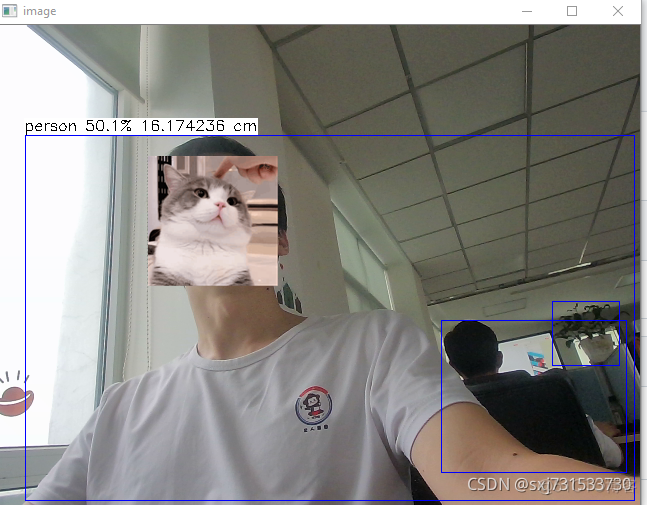
测试结果
测试结果数据
这里存在几个问题:
(1)搜集的图片尽量存在20cm-100cm之间的距离 进行均匀采集
(2)在获得内参和外参的基础之上,通过下面代码,通过鼠标点击获取uniquenessRationumDisparitiesblockSize 合适参数
代码我和centerface结合了一下,这里只放cmakelists.txt和main函数了 window10+clion+ncnn
cmakelists.txt
cmake_minimum_required(VERSION 3.16)
project(processSVG)

set(CMAKE_CXX_STANDARD 14)

set(CMAKE_CXX_FLAGS "${CMAKE_CXX_FLAGS} -std=c++11")
# Where to find CMake modules and OpenCV
set(CMAKE_C_FLAGS "${CMAKE_C_FLAGS} -o3 -lstdc++")
set(CMAKE_CXX_FLAGS "${CMAKE_CXX_FLAGS} -o3 -lstdc++")
set(CMAKE_C_FLAGS "${CMAKE_C_FLAGS} -fopenmp ")
set(CMAKE_CXX_FLAGS "${CMAKE_CXX_FLAGS} -fopenmp ")

include_directories(${CMAKE_SOURCE_DIR})
include_directories(${CMAKE_SOURCE_DIR}/include)
set(OpenCV_DIR "D:\\Opencv440\\buildMinGW")#改为mingw-bulid的位置
set(CMAKE_MODULE_PATH ${CMAKE_MODULE_PATH} "${CMAKE_SOURCE_DIR}/cmake/")
find_package(OpenCV REQUIRED)
include_directories(${OpenCV_INCLUDE_DIRS})
add_library(libncnn STATIC IMPORTED)
set_target_properties(libncnn PROPERTIES IMPORTED_LOCATION ${CMAKE_SOURCE_DIR}/lib/libncnn.a)


add_executable(processSVG main.cpp ncnn_centerface.cpp)

target_link_libraries(processSVG ${OpenCV_LIBS} libncnn)
主函数
/*        双目测距        */
#include <opencv2/opencv.hpp>
#include <iostream>
#include <cmath>
#include <xmath.h>
#include "ncnn/layer.h"
#include "ncnn/net.h"
#include "ncnn_centerface.h"
#include <opencv2/core/core.hpp>
#include <opencv2/highgui/highgui.hpp>
#include <opencv2/imgproc/imgproc.hpp>
#include <float.h>
#include <stdio.h>
#include <vector>
#include <opencv2/imgcodecs/legacy/constants_c.h>


using namespace std;
using namespace cv;


const int imageWidth = 640;                             //摄像头的分辨率
const int imageHeight = 480;
Vec3f  point3;
float d;
Size imageSize = Size(imageWidth, imageHeight);

Mat rgbImageL, grayImageL;
Mat rgbImageR, grayImageR;
Mat rectifyImageL, rectifyImageR;

Rect validROIL;//图像校正之后,会对图像进行裁剪,这里的validROI就是指裁剪之后的区域
Rect validROIR;

Mat mapLx, mapLy, mapRx, mapRy;     //映射表
Mat Rl, Rr, Pl, Pr, Q;              //校正旋转矩阵R,投影矩阵P 重投影矩阵Q
Mat xyz;              //三维坐标

Point origin;         //鼠标按下的起始点
Rect selection;      //定义矩形选框
bool selectObject = false;    //是否选择对象

int blockSize = 0, uniquenessRatio = 0, numDisparities = 0;
Ptr<StereoBM> bm = StereoBM::create(16, 9);
/*事先标定好的左相机的内参矩阵
fx 0 cx
0 fy cy
0  0  1
*/
Mat cameraMatrixA = (Mat_<double>(3, 3) << 4.149355112144709e+02,0,0,
        -0.019341856472956,4.156035954214909e+02,0,
        3.257696468923052e+02,2.448497744063740e+02,1);
Mat cameraMatrixL=cameraMatrixA.t();
//获得的畸变参数

/*stereoParams.CameraParameters1.IntrinsicMatrix
[4.149355112144709e+02,0,0;-0.019341856472956,4.156035954214909e+02,0;3.257696468923052e+02,2.448497744063740e+02,1]*/ //2


Mat distCoeffL = (Mat_<double>(5, 1) << 0.130595894345384,-0.190176119215364, -0.004166292134910,-0.003766825258815, 0.00000);
//stereoParams.CameraParameters1.RadialDistortion [0.130595894345384,-0.190176119215364]
//stereoParams.CameraParameters1.TangentialDistortion [-0.004166292134910,-0.003766825258815]

/*事先标定好的右相机的内参矩阵
fx 0 cx
0 fy cy
0  0  1
*/
Mat cameraMatrixB = (Mat_<double>(3, 3) << 4.139180204577112e+02,0,0,
        0.029448662832850,4.146306233114825e+02,0,
        3.271639636263911e+02,2.456654696723879e+02,1);
Mat cameraMatrixR=  cameraMatrixB.t();
/*
stereoParams.CameraParameters2.IntrinsicMatrix
[4.139180204577112e+02,0,0;0.029448662832850,4.146306233114825e+02,0;3.271639636263911e+02,2.456654696723879e+02,1]
*/ //2

Mat distCoeffR = (Mat_<double>(5, 1) <<0.129984106525251,-0.197112245349844,-0.004303918766484,-0.003130015130199, 0.00000);
//stereoParams.CameraParameters2.RadialDistortion [0.129984106525251,-0.197112245349844]
//stereoParams.CameraParameters2.TangentialDistortion [-0.004303918766484,-0.003130015130199]

Mat T = (Mat_<double>(3, 1) << 24.667447456592086,0.033308552444477,-0.023487988435056);//T平移向量
//stereoParams.TranslationOfCamera2 [24.667447456592086,0.033308552444477,-0.023487988435056]
//对应Matlab所得T参数
//Mat rec = (Mat_<double>(3, 1) << -0.00306, -0.03207, 0.00206);//rec旋转向量,对应matlab om参数  我
Mat recA = (Mat_<double>(3, 3) <<0.999999654030137,-6.046386766296149e-05,8.296286682854630e-04,
        6.410157150999440e-05,0.999990381981649,-0.004385411632335,
        -8.293555299531221e-04,0.004385463295617,0.999990039890942);                //rec旋转向量,对应matlab om参数  我
/*
 [0.999999654030137,-6.046386766296149e-05,8.296286682854630e-04;6.410157150999440e-05,0.999990381981649,-0.004385411632335;-8.293555299531221e-04,0.004385463295617,0.999990039890942]

  */
Mat rec=recA.t();
Mat R;//R 旋转矩阵


/*****立体匹配*****/
Mat stereo_match(int, void*)
{
    bm->setBlockSize(21);     //SAD窗口大小,5~21之间为宜
    bm->setROI1(validROIL);
    bm->setROI2(validROIR);
    bm->setPreFilterCap(31);
    bm->setMinDisparity(0);  //最小视差,默认值为0, 可以是负值,int型
    bm->setNumDisparities(32);//视差窗口,即最大视差值与最小视差值之差,窗口大小必须是16的整数倍,int型
    bm->setTextureThreshold(10);
    bm->setUniquenessRatio(0);//uniquenessRatio主要可以防止误匹配
    bm->setSpeckleWindowSize(100);
    bm->setSpeckleRange(32);
    bm->setDisp12MaxDiff(-1);
    Mat disp, disp8;
    bm->compute(rectifyImageL, rectifyImageR, disp);//输入图像必须为灰度图
    disp.convertTo(disp8, CV_8U, 255 / ((numDisparities * 16 + 16)*16.));//计算出的视差是CV_16S格式
    reprojectImageTo3D(disp, xyz, Q, true); //在实际求距离时,ReprojectTo3D出来的X / W, Y / W, Z / W都要乘以16(也就是W除以16),才能得到正确的三维坐标信息。
    xyz = xyz * 16;
    return disp8;
}


/*****主函数*****/
int main() {
    /*
    立体校正
    */
    Rodrigues(rec, R); //Rodrigues变换
    stereoRectify(cameraMatrixL, distCoeffL, cameraMatrixR, distCoeffR, imageSize, R, T, Rl, Rr, Pl, Pr, Q,
                  CALIB_ZERO_DISPARITY,
                  0, imageSize, &validROIL, &validROIR);
    initUndistortRectifyMap(cameraMatrixL, distCoeffL, Rl, Pr, imageSize, CV_32FC1, mapLx, mapLy);
    initUndistortRectifyMap(cameraMatrixR, distCoeffR, Rr, Pr, imageSize, CV_32FC1, mapRx, mapRy);

    Centerface centerface;

    centerface.init("C:");
    VideoCapture cap0,cap1;

    // 2.打开默认相机;
    cap0.open(0);
    cap1.open(1);

    while (true) {
        Mat frame0, frame1;
        cap0 >> frame0;
        cap1 >> frame1;
        //frame0 = imread("F:\\snapshotA\\left\\left_3.jpg", CV_LOAD_IMAGE_COLOR);

        //frame1 = imread("F:\\snapshotA\\right\\right_3.jpg", CV_LOAD_IMAGE_COLOR);

        if (frame0.empty())
            return 0;
        if (frame1.empty())
            return 0;

        rgbImageL = frame0;
        cvtColor(rgbImageL, grayImageL, COLOR_BGR2GRAY);
        rgbImageR = frame1;
        cvtColor(rgbImageR, grayImageR, COLOR_BGR2GRAY);

        //imshow("ImageL Before Rectify", grayImageL);
        //imshow("ImageR Before Rectify", grayImageR);

        /*
        经过remap之后,左右相机的图像已经共面并且行对准了
        */
        remap(grayImageL, rectifyImageL, mapLx, mapLy, INTER_LINEAR);
        remap(grayImageR, rectifyImageR, mapRx, mapRy, INTER_LINEAR);

        /*
        把校正结果显示出来
        */
        Mat rgbRectifyImageL, rgbRectifyImageR;
        cvtColor(rectifyImageL, rgbRectifyImageL, COLOR_GRAY2BGR);  //伪彩色图
        cvtColor(rectifyImageR, rgbRectifyImageR, COLOR_GRAY2BGR);


        Mat disp8=stereo_match(0, 0);
        Mat image=frame0;
        std::vector<FaceInfo> face_info;
        ncnn::Mat inmat = ncnn::Mat::from_pixels(image.data, ncnn::Mat::PIXEL_BGR2RGB, image.cols, image.rows);
        centerface.detect(inmat, face_info, image.cols, image.rows);
        float minDistance=0;
        int  count=0;

        int maxi = -1;
        int maxj = -1;
        for (int i = 0; i < face_info.size(); i++)
        {
            uchar gray= 0;
            for (int j = face_info[i].x1; j < face_info[i].x2-face_info[i].x1; j++)
            {
                for (int k = face_info[i].y1; k < face_info[i].y2-face_info[i].y1; k++)
                {

                     if((int)disp8.at<uchar>( j, k)>(int)gray){
                         maxi=+j;
                         maxj= k;
                         gray=disp8.at<uchar>( j, k);

                     }
                }

            }
        }


        int x=maxi;
        int y=maxj;
        std::cout<<" x= "<<x<<" "<<y<<std::endl;
        if(x>=xyz.rows||y>=xyz.rows||x<0||y<0)
            continue;
        //std::cout<<" x= "<<x<<" "<<y<<std::endl;
        origin = Point(x, y);
        selection = Rect(x, y, 0, 0);
        selectObject = true;
        //cout << origin << "in world coordinate is: " << xyz.at<Vec3f>(origin) << endl;

        //std::cout<<xyz.rows<<" "<<xyz.rows<<std::endl;
        point3 = xyz.at<Vec3f>(origin);
        point3[0];
        //cout << "point3[0]:" << point3[0] << "point3[1]:" << point3[1] << "point3[2]:" << point3[2]<<endl;
        // cout << "世界坐标:" << endl;
        //cout << "x: " << point3[0] << "  y: " << point3[1] << "  z: " << point3[2] << endl;
        d = point3[0] * point3[0] + point3[1] * point3[1] + point3[2] * point3[2];
        d = sqrt(d);   //mm


        d = d / 10.0;   //cm


        for (int i = 0; i < face_info.size(); i++) {
            cv::rectangle(image, cv::Point(face_info[i].x1, face_info[i].y1), cv::Point(face_info[i].x2, face_info[i].y2), cv::Scalar(0, 255, 0), 2);
            for (int j = 0; j < 5; j++) {
                cv::circle(image, cv::Point(face_info[i].landmarks[2*j], face_info[i].landmarks[2*j+1]), 2, cv::Scalar(255, 255, 0), 2);
            }
            char text[256];
            sprintf(text, "%f %.2f%%", d, face_info[i].score);
            cv::putText(image, text, cv::Point(face_info[i].x1, face_info[i].y1 ),
                        cv::FONT_HERSHEY_SIMPLEX, 0.5, cv::Scalar(0, 0, 255));
        }


        cout << "距离是:" << d << "cm" << endl;


        imshow("image",image);
        imshow("disparity", disp8);
        waitKey(1);

    }
    return 0;
}
实时目标检测和距离测量代码
参考:基于OpenCV的双目摄像头测距(误差小)-阿里云开发者社区


.png)

.png)

