 云计算服务
云计算服务
 服务器租用
服务器租用
 DDOS 防护
 虚拟主机
虚拟主机
 域名服务
域名服务
 基础设施
基础设施
 关于我们
关于我们
基本思想:最近思索做个产品,因此前期调研相关技术,准备开干,,呦呦呦
http://dranger.com/ffmpeg/tutorial01.html

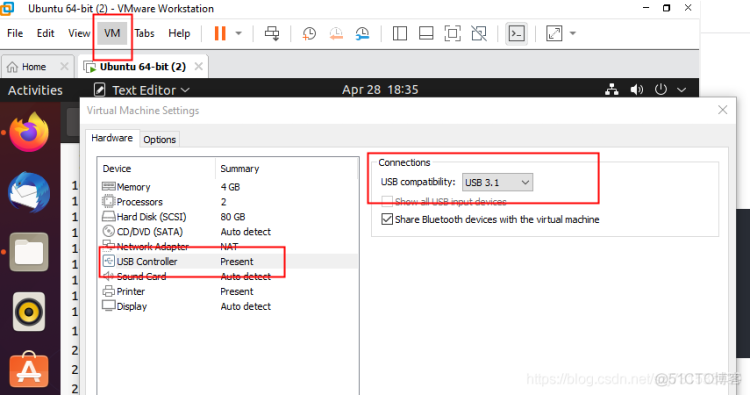
1:虚拟机设置USB3.1
2:虚拟机设置摄像头连接

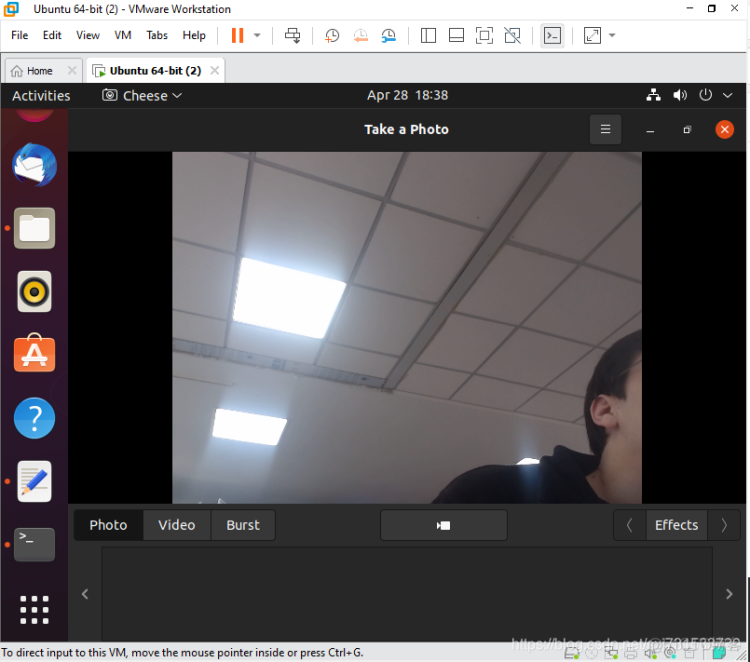
3:虚拟机打开摄像头
ubuntu@ubuntu:~$ cheese

(cheese:6540): Gdk-WARNING **: 18:38:34.397: Native Windows taller than 65535 pixels are not supported
一、使用nginx搭建流媒体服务器
ubuntu@ubuntu:~/Downloads/demo$ wget http://nginx.org/download/nginx-1.17.3.tar.gz
ubuntu@ubuntu:~/Downloads/demo$ tar -zxvf nginx-1.17.3.tar.gz
ubuntu@ubuntu:~/Downloads/demo$ cd nginx-1.17.3/
ubuntu@ubuntu:~/Downloads/demo/nginx-1.17.3$ git clone https://github.com/arut/nginx-rtmp-module
ubuntu@ubuntu:~/Downloads/demo/nginx-1.17.3$ ./configure --add-module=nginx-rtmp-module
ubuntu@ubuntu:~/Downloads/demo/nginx-1.17.3$ make
ubuntu@ubuntu:~/Downloads/demo/nginx-1.17.3$ sudo make install
然后修改一下配置 配置文件
ubuntu@ubuntu:~/Downloads/demo/nginx-1.17.3$ sudo gedit /usr/local/nginx/conf/nginx.conf
源文件
#user  nobody;
worker_processes  1;

#error_log  logs/error.log;
#error_log  logs/error.log  notice;
#error_log  logs/error.log  info;

#pid        logs/nginx.pid;


events {
    worker_connections  1024;
}


http {
    include       mime.types;
    default_type  application/octet-stream;

    #log_format  main  '$remote_addr - $remote_user [$time_local] "$request" '
    #                  '$status $body_bytes_sent "$http_referer" '
    #                  '"$http_user_agent" "$http_x_forwarded_for"';

    #access_log  logs/access.log  main;

    sendfile        on;
    #tcp_nopush     on;

    #keepalive_timeout  0;
    keepalive_timeout  65;

    #gzip  on;

    server {
        listen       80;
        server_name  localhost;

        #charset koi8-r;

        #access_log  logs/host.access.log  main;

        location / {
            root   html;
            index  index.html index.htm;
        }

        #error_page  404              /404.html;

        # redirect server error pages to the static page /50x.html
        #
        error_page   500 502 503 504  /50x.html;
        location = /50x.html {
            root   html;
        }

        # proxy the PHP scripts to Apache listening on 127.0.0.1:80
        #
        #location ~ \.php$ {
        #    proxy_pass   http://127.0.0.1;
        #}

        # pass the PHP scripts to FastCGI server listening on 127.0.0.1:9000
        #
        #location ~ \.php$ {
        #    root           html;
        #    fastcgi_pass   127.0.0.1:9000;
        #    fastcgi_index  index.php;
        #    fastcgi_param  SCRIPT_FILENAME  /scripts$fastcgi_script_name;
        #    include        fastcgi_params;
        #}

        # deny access to .htaccess files, if Apache's document root
        # concurs with nginx's one
        #
        #location ~ /\.ht {
        #    deny  all;
        #}
    }


    # another virtual host using mix of IP-, name-, and port-based configuration
    #
    #server {
    #    listen       8000;
    #    listen       somename:8080;
    #    server_name  somename  alias  another.alias;

    #    location / {
    #        root   html;
    #        index  index.html index.htm;
    #    }
    #}


    # HTTPS server
    #
    #server {
    #    listen       443 ssl;
    #    server_name  localhost;

    #    ssl_certificate      cert.pem;
    #    ssl_certificate_key  cert.key;

    #    ssl_session_cache    shared:SSL:1m;
    #    ssl_session_timeout  5m;

    #    ssl_ciphers  HIGH:!aNULL:!MD5;
    #    ssl_prefer_server_ciphers  on;

    #    location / {
    #        root   html;
    #        index  index.html index.htm;
    #    }
    #}

}
修改之后
#user  nobody;
worker_processes  1;

#error_log  logs/error.log;
#error_log  logs/error.log  notice;
#error_log  logs/error.log  info;

#pid        logs/nginx.pid;


events {
    worker_connections  1024;
}
rtmp {
    server {

        listen 1935;

        chunk_size 4000;

    application play {
            play /usr/local/nginx/html/play;
        }

    application hls {
            live on;
            hls on;
            hls_path /usr/local/nginx/html/hls;
        hls_fragment 1s;
        hls_playlist_length 4s;
        }

    application live {
            live on;
        }
    }
}

http {
    include       mime.types;
    default_type  application/octet-stream;

    #log_format  main  '$remote_addr - $remote_user [$time_local] "$request" '
    #                  '$status $body_bytes_sent "$http_referer" '
    #                  '"$http_user_agent" "$http_x_forwarded_for"';

    #access_log  logs/access.log  main;

    sendfile        on;
    #tcp_nopush     on;

    #keepalive_timeout  0;
    keepalive_timeout  65;

    #gzip  on;

    server {
        listen       80;
        server_name  localhost;

     location /stat {
            rtmp_stat all;
            rtmp_stat_stylesheet stat.xsl;
        }

        location /stat.xsl {
            # XML stylesheet to view RTMP stats.
            # Copy stat.xsl wherever you want
            # and put the full directory path here
            root /usr/local/nginx-rtmp-module;
        }

        location /hls {
            # Serve HLS fragments
            types {
                application/vnd.apple.mpegurl m3u8;
                video/mp2t ts;
            }
            root /usr/local/nginx/html;
            add_header Cache-Control no-cache;
        }
        #charset koi8-r;

        #access_log  logs/host.access.log  main;

        location / {
            root   html;
            index  index.html index.htm;
        }

        #error_page  404              /404.html;

        # redirect server error pages to the static page /50x.html
        #
        error_page   500 502 503 504  /50x.html;
        location = /50x.html {
            root   html;
        }

        # proxy the PHP scripts to Apache listening on 127.0.0.1:80
        #
        #location ~ \.php$ {
        #    proxy_pass   http://127.0.0.1;
        #}

        # pass the PHP scripts to FastCGI server listening on 127.0.0.1:9000
        #
        #location ~ \.php$ {
        #    root           html;
        #    fastcgi_pass   127.0.0.1:9000;
        #    fastcgi_index  index.php;
        #    fastcgi_param  SCRIPT_FILENAME  /scripts$fastcgi_script_name;
        #    include        fastcgi_params;
        #}

        # deny access to .htaccess files, if Apache's document root
        # concurs with nginx's one
        #
        #location ~ /\.ht {
        #    deny  all;
        #}
    }


    # another virtual host using mix of IP-, name-, and port-based configuration
    #
    #server {
    #    listen       8000;
    #    listen       somename:8080;
    #    server_name  somename  alias  another.alias;

    #    location / {
    #        root   html;
    #        index  index.html index.htm;
    #    }
    #}


    # HTTPS server
    #
    #server {
    #    listen       443 ssl;
    #    server_name  localhost;

    #    ssl_certificate      cert.pem;
    #    ssl_certificate_key  cert.key;

    #    ssl_session_cache    shared:SSL:1m;
    #    ssl_session_timeout  5m;

    #    ssl_ciphers  HIGH:!aNULL:!MD5;
    #    ssl_prefer_server_ciphers  on;

    #    location / {
    #        root   html;
    #        index  index.html index.htm;
    #    }
    #}

}
启动Nginx
ubuntu@ubuntu:$ sudo ./usr/local/nginx/sbin/nginx -c /usr/local/nginx/conf/nginx.conf
或者
ubuntu@ubuntu:/usr/local/nginx/sbin$ sudo ./nginx -c /usr/local/nginx/conf/nginx.conf
查看一下nginx 是否启动
ubuntu@ubuntu:/usr/local/nginx$ ps -ef | grep nginx
root      179285    2171  0 20:25 ?        00:00:00 nginx: master process ./sbin/nginx -c conf/nginx.conf
nobody    179286  179285  0 20:25 ?        00:00:00 nginx: worker process
nobody    179287  179285  0 20:25 ?        00:00:00 nginx: cache manager process
ubuntu    183898   18309  0 20:33 pts/0    00:00:00 grep --color=auto nginx
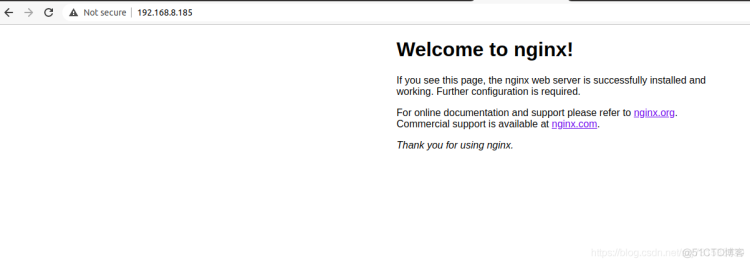
输入ip地址确定一下是否启动nginx (服务器的地址=本地的ip地址)
http://192.168.8.185:80
然后我愉快的推送视频流吧
使用本地的主机(192.168.10.99)和视频向服务器(192.168.8.185)推送摄像头的视频流
ubuntu@ubuntu:/usr/local/nginx/html$ ffmpeg -f video4linux2 -i /dev/video0 -f flv rtmp://192.168.8.185/live/livestream
如果出现错误
Cannot read RTMP handshake response.
检查一下端口是否正确
百度下载smplayer播放器,在open---》URL输入推流地址也可以添加端口rtmp://192.168.8.185:1935/live/livestream
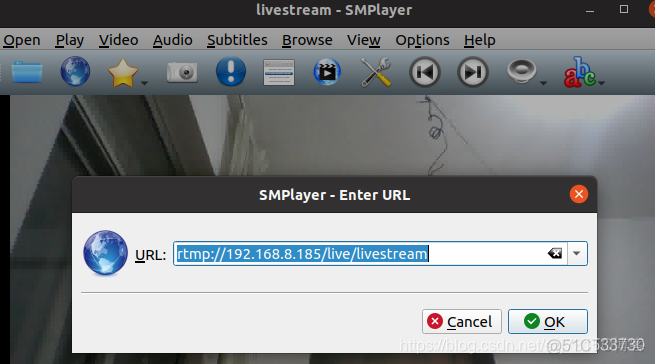
使用smplayer播放器 输入
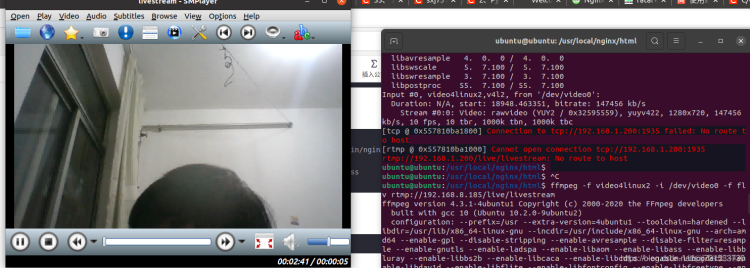
就看到从树莓派推送过来的视频流了(我是在单个主机上验证的 存在延迟)
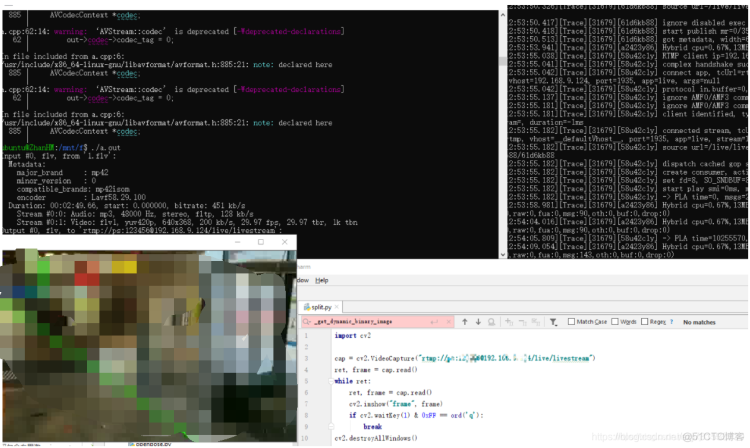
在本地可以使用python代码访问到远程服务器(192.168.8.185)服务的视频流
import cv2
cap = cv2.VideoCapture("rtmp://ubuntu:ubuntu@192.168.8.185:1935/live/livestream")
ret, frame = cap.read()
while ret:
    ret, frame = cap.read()
    cv2.imshow("frame",frame)
    if cv2.waitKey(1) & 0xFF == ord('q'):
        break
cv2.destroyAllWindows()
cap.release()
推送视频也同样如此
ubuntu@ubuntu:/usr/local/nginx/html$ ffmpeg -re -i /home/ubuntu/test.mp4 -vcodec copy -f flv rtmp://192.168.8.185/live/livestream
同样python脚本读一下
import cv2
cap = cv2.VideoCapture("rtmp://ubuntu:ubuntu@192.168.8.185:1935/live/livestream")
ret, frame = cap.read()
while ret:
    ret, frame = cap.read()
    cv2.imshow("frame",frame)
    if cv2.waitKey(1) & 0xFF == ord('q'):
        break
cv2.destroyAllWindows()
cap.release()
二、使用SRC的搭建流服务器(注意端口和nginx的端口区分开)
ubuntu@ubuntu:~$ git clone  srs
ubuntu@ubuntu:~/srs/trunk$ cd trunk
ubuntu@ubuntu:~/srs/trunk$./configure && make
.....
make[2]: Leaving directory '/home/ps/TESTINT8YOL5/srs/trunk'
The build summary:
     +------------------------------------------------------------------------------------
     For SRS benchmark, gperf, gprof and valgrind, please read:

     +------------------------------------------------------------------------------------
     |The main server usage: ./objs/srs -c conf/srs.conf, start the srs server
     |     About HLS, please read https://github.com/ossrs/srs/wiki/v2_CN_DeliveryHLS
     |     About DVR, please read https://github.com/ossrs/srs/wiki/v3_CN_DVR
     |     About SSL, please read https://github.com/ossrs/srs/wiki/v1_CN_RTMPHandshake
     |     About transcoding, please read https://github.com/ossrs/srs/wiki/v3_CN_FFMPEG
     |     About ingester, please read https://github.com/ossrs/srs/wiki/v1_CN_Ingest
     |     About http-callback, please read https://github.com/ossrs/srs/wiki/v3_CN_HTTPCallback
     |     Aoubt http-server, please read https://github.com/ossrs/srs/wiki/v2_CN_HTTPServer
     |     About http-api, please read https://github.com/ossrs/srs/wiki/v3_CN_HTTPApi
     |     About stream-caster, please read https://github.com/ossrs/srs/wiki/v2_CN_Streamer
     |     (Disabled) About VALGRIND, please read https://github.com/ossrs/state-threads/issues/2
     +------------------------------------------------------------------------------------
binaries, please read https://github.com/ossrs/srs/wiki/v2_CN_Build
You can:
      ./objs/srs -c conf/srs.conf
                  to start the srs server, with config conf/srs.conf.
make[1]: Leaving directory '/home/ps/TESTINT8YOL5/srs/trunk'
ubuntu@ubuntu:~/srs/trunk$ ./objs/srs -c conf/rtmp.conf
[2021-04-27 10:57:36.988][Trace][31474][c43653i4] XCORE-SRS/5.0.1(Leo)
[2021-04-27 10:57:36.988][Trace][31474][c43653i4] config parse complete
[2021-04-27 10:57:36.988][Trace][31474][c43653i4] write log to console
[2021-04-27 10:57:36.988][Trace][31474][c43653i4][MAIN] SRS/5.0.1(Leo), MIT
[2021-04-27 10:57:36.988][Trace][31474][c43653i4] authors: Winlin,Wenjie,Runner365,John,B.P.Y,Lixin
[2021-04-27 10:57:36.988][Trace][31474][c43653i4] contributors: winlin<winlin@vip.126.com> wenjie.zhao<740936897@qq.com> xiangcheng.liu<liuxc0116@foxmail.com> naijia.liu<youngcow@youngcow.net> alcoholyi<alcoholyi@qq.com> byteman<wangchen2011@gmail.com> chad.wang<chad.wang.cn@gmail.com> suhetao<suhetao@gmail.com> Joh
....
三、使用代码推流也还可以c+++srs
代码来自:简单的ffmpeg推流(C++实现)_我要出家当道士_c++ ffmpeg 推流
/**
 * 最简单的基于FFmpeg的推流器(推送RTMP)
 * Simplest FFmpeg Streamer (Send RTMP)
 *
 * 雷霄骅 Lei Xiaohua  神级人物  怀念你 。。。。
 * leixiaohua1020@126.com
 * 中国传媒大学/数字电视技术
 */

#include <stdio.h>

#define __STDC_CONSTANT_MACROS

#ifdef _WIN32
//Windows
extern "C"
{
#include "libavformat/avformat.h"
#include "libavutil/mathematics.h"
#include "libavutil/time.h"
};
#else
//Linux...
#ifdef __cplusplus
extern "C"
{
#endif
#include <libavformat/avformat.h>
#include <libavutil/mathematics.h>
#include <libavutil/time.h>
#ifdef __cplusplus
};
#endif
#endif

int main(int argc, char* argv[])
{
  AVOutputFormat *ofmt = NULL;
  //输入对应一个AVFormatContext,输出对应一个AVFormatContext
  //(Input AVFormatContext and Output AVFormatContext)
  AVFormatContext *ifmt_ctx = NULL, *ofmt_ctx = NULL;
  //* AVFormatContext是一个统筹全局的结构, 包含一些视频文件名,视频时长,视频码率等封装格式信息。
  AVPacket pkt;
  const char *in_filename, *out_filename;
  int ret, i;
  int videoindex=-1;
  int frame_index=0;
  int64_t start_time=0;
  //in_filename  = "cuc_ieschool.mov";
  //in_filename  = "cuc_ieschool.mkv";
  //in_filename  = "cuc_ieschool.ts";
  //in_filename  = "cuc_ieschool.mp4";
  //in_filename  = "cuc_ieschool.h264";
  in_filename  = "./1.mp4";//输入URL(Input file URL)
  //in_filename  = "shanghai03_p.h264";

  out_filename = "rtmp://ubuntu:ubuntu@192.168.2.101/live/livestream";//输出 URL(Output URL)[RTMP]
  //out_filename = "rtp://233.233.233.233:6666";//输出 URL(Output URL)[UDP]

  av_register_all();
  //Network 这里注册了所有的文件格式和编解码器的库
  avformat_network_init();
  //输入(Input)
  if ((ret = avformat_open_input(&ifmt_ctx, in_filename, 0, 0)) < 0) {
    printf( "Could not open input file.");
    goto end;
  }
  /*
  ps:函数调用成功之后处理过的AVFormatContext结构体
file:打开的视音频流的URL
fmt:强制指定AVFormatContext中AVInputFormat的。这个参数一般情况下可以设置为NULL,这样FFmpeg可以自动检测AVInputFormat

dictionay:附加的一些选项,一般情况下可以设置为NULL
*/
  if ((ret = avformat_find_stream_info(ifmt_ctx, 0)) < 0) {
    printf( "Failed to retrieve input stream information");
    goto end;
  }
  /*
  ic:输入的AVFormatContext。
options:额外的选项,目前没有深入研究过。
  */

  for(i=0; i<ifmt_ctx->nb_streams; i++)
    if(ifmt_ctx->streams[i]->codec->codec_type==AVMEDIA_TYPE_VIDEO){
      videoindex=i;
      break;
    }
 /*
 仅仅处理视频流,而不是音频流。查找视频流的id。
 */
  av_dump_format(ifmt_ctx, 0, in_filename, 0);
 /*
 打印关于输入或输出格式的详细信息
 */
  //输出(Output)

  avformat_alloc_output_context2(&ofmt_ctx, NULL, "flv", out_filename); //RTMP
  /*
  ctx:函数调用成功之后创建的AVFormatContext结构体。
oformat:指定AVFormatContext中的AVOutputFormat,用于确定输出格式。如果指定为NULL,可以设定后两个参数(format_name或者filename)由FFmpeg猜测输出格式。
PS:使用该参数需要自己手动获取AVOutputFormat,相对于使用后两个参数来说要麻烦一些。
format_name:指定输出格式的名称。根据格式名称,FFmpeg会推测输出格式。输出格式可以是“flv”,“mkv”等等。
filename:指定输出文件的名称。根据文件名称,FFmpeg会推测输出格式。文件名称可以是“xx.flv”,“yy.mkv”等等。
函数执行成功的话,其返回值大于等于0。   */
  //avformat_alloc_output_context2(&ofmt_ctx, NULL, "mpegts", out_filename);//UDP

  if (!ofmt_ctx) {
    printf( "Could not create output context\n");
    ret = AVERROR_UNKNOWN;
    goto end;
  }
  ofmt = ofmt_ctx->oformat;
  for (i = 0; i < ifmt_ctx->nb_streams; i++) {
    //根据输入流创建输出流(Create output AVStream according to input AVStream)
    AVStream *in_stream = ifmt_ctx->streams[i];
    AVStream *out_stream = avformat_new_stream(ofmt_ctx, in_stream->codec->codec);
    if (!out_stream) {
      printf( "Failed allocating output stream\n");
      ret = AVERROR_UNKNOWN;
      goto end;
    }
    //复制AVCodecContext的设置(Copy the settings of AVCodecContext)
    ret = avcodec_copy_context(out_stream->codec, in_stream->codec);
    if (ret < 0) {
      printf( "Failed to copy context from input to output stream codec context\n");
      goto end;
    }
    out_stream->codec->codec_tag = 0;
    if (ofmt_ctx->oformat->flags & AVFMT_GLOBALHEADER)
      out_stream->codec->flags |= AV_CODEC_FLAG_GLOBAL_HEADER;
  }
  //Dump Format------------------
  av_dump_format(ofmt_ctx, 0, out_filename, 1);
  //打开输出URL(Open output URL)
  if (!(ofmt->flags & AVFMT_NOFILE)) {
    ret = avio_open(&ofmt_ctx->pb, out_filename, AVIO_FLAG_WRITE);
    if (ret < 0) {
      printf( "Could not open output URL '%s'", out_filename);
      goto end;
    }
  }
  //写文件头(Write file header)
  ret = avformat_write_header(ofmt_ctx, NULL);
  if (ret < 0) {
    printf( "Error occurred when opening output URL\n");
    goto end;
  }

  start_time=av_gettime();
  while (1) {
    AVStream *in_stream, *out_stream;
    //获取一个AVPacket(Get an AVPacket)
    ret = av_read_frame(ifmt_ctx, &pkt);
    if (ret < 0)
      break;
    //FIX:No PTS (Example: Raw H.264)
    //Simple Write PTS
    if(pkt.pts==AV_NOPTS_VALUE){
      //Write PTS
      AVRational time_base1=ifmt_ctx->streams[videoindex]->time_base;
      //Duration between 2 frames (us)
      int64_t calc_duration=(double)AV_TIME_BASE/av_q2d(ifmt_ctx->streams[videoindex]->r_frame_rate);
      //Parameters
      pkt.pts=(double)(frame_index*calc_duration)/(double)(av_q2d(time_base1)*AV_TIME_BASE);
      pkt.dts=pkt.pts;
      pkt.duration=(double)calc_duration/(double)(av_q2d(time_base1)*AV_TIME_BASE);
    }
    //Important:Delay
    if(pkt.stream_index==videoindex){
      AVRational time_base=ifmt_ctx->streams[videoindex]->time_base;
      AVRational time_base_q={1,AV_TIME_BASE};
      int64_t pts_time = av_rescale_q(pkt.dts, time_base, time_base_q);
      int64_t now_time = av_gettime() - start_time;
      if (pts_time > now_time)
        av_usleep(pts_time - now_time);

    }

    in_stream  = ifmt_ctx->streams[pkt.stream_index];
    out_stream = ofmt_ctx->streams[pkt.stream_index];
    /* copy packet */
    //转换PTS/DTS(Convert PTS/DTS)
    pkt.pts = av_rescale_q_rnd(pkt.pts, in_stream->time_base, out_stream->time_base, (AVRounding)(AV_ROUND_NEAR_INF|AV_ROUND_PASS_MINMAX));
    pkt.dts = av_rescale_q_rnd(pkt.dts, in_stream->time_base, out_stream->time_base, (AVRounding)(AV_ROUND_NEAR_INF|AV_ROUND_PASS_MINMAX));
    pkt.duration = av_rescale_q(pkt.duration, in_stream->time_base, out_stream->time_base);
    pkt.pos = -1;
    //Print to Screen
    if(pkt.stream_index==videoindex){
      printf("Send %8d video frames to output URL\n",frame_index);
      frame_index++;
    }
    //ret = av_write_frame(ofmt_ctx, &pkt);
    ret = av_interleaved_write_frame(ofmt_ctx, &pkt);

    if (ret < 0) {
      printf( "Error muxing packet\n");
      break;
    }

    av_free_packet(&pkt);

  }
  //写文件尾(Write file trailer)
  av_write_trailer(ofmt_ctx);
end:
  avformat_close_input(&ifmt_ctx);
  /* close output */
  if (ofmt_ctx && !(ofmt->flags & AVFMT_NOFILE))
    avio_close(ofmt_ctx->pb);
  avformat_free_context(ofmt_ctx);
  if (ret < 0 && ret != AVERROR_EOF) {
    printf( "Error occurred.\n");
    return -1;
  }
  return 0;
}
编译命令为:
ubuntu@ZhanHM:$ g++ ffmpegTest.cpp -lavformat -lavcodec -lswscale -lavutil -lz
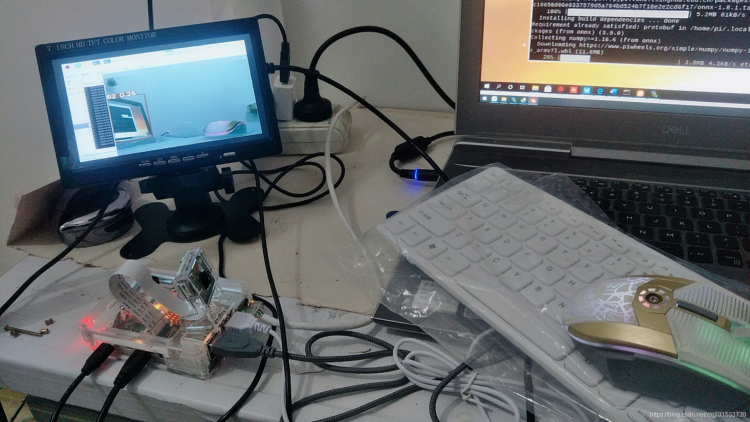
三、测试了一个yolo3的检测效果,小小树莓派推流还是很给力的;详细操作参考一二自行操作
树莓派使用nanodet单纯做检测大概在238~278ms左右,要是追加ffmpeg进行推流大概在400-500ms左右
源代码:https://github.com/ultralytics/yolov3
Torch1.7安装whl
链接:https://pan.baidu.com/s/1DGftm6QGDbjLkxmOiE1MRw
提取码:hkb5
复制这段内容后打开百度网盘手机App,操作更方便哦
四、Android 代码推流


.png)

.png)

