 云计算服务
云计算服务
 服务器租用
服务器租用
 DDOS 防护
 虚拟主机
虚拟主机
 域名服务
域名服务
 基础设施
基础设施
 关于我们
关于我们
基本思想:进行手机端android的N21编码转视频流和C++端的FFMEGG视频推流(真心不会写android,东拼西凑的代码~)(查看linux推流服务器,请直接看第二部分)
一、(1)创建Android的Native基础工程--完成
(2)在基础的工程之上,创建页面imageview布局,留给视频流显示
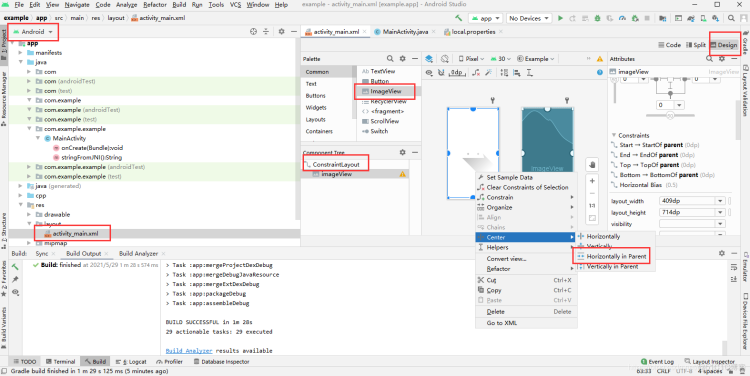
对应的code代码
<?xml version="1.0" encoding="utf-8"?>
<androidx.constraintlayout.widget.ConstraintLayout xmlns:android="http://schemas.android.com/apk/res/android"
    xmlns:app="http://schemas.android.com/apk/res-auto"
    xmlns:tools="http://schemas.android.com/tools"
    android:layout_width="match_parent"
    android:layout_height="match_parent"
    tools:context=".MainActivity">

    <ImageView
        android:id="@+id/imageView"
        android:layout_width="409dp"
        android:layout_height="714dp"
        app:layout_constraintBottom_toBottomOf="parent"
        app:layout_constraintEnd_toEndOf="parent"
        app:layout_constraintHorizontal_bias="0.5"
        app:layout_constraintStart_toStartOf="parent"
        app:layout_constraintTop_toTopOf="parent"
        app:srcCompat="@drawable/ic_launcher_foreground" />
    <TextureView
        android:id="@+id/view_finder"
        android:layout_width="0dp"
        android:layout_height="0dp"
        app:layout_constraintBottom_toBottomOf="parent"
        app:layout_constraintDimensionRatio="h,4:3"
        app:layout_constraintStart_toStartOf="parent"
        app:layout_constraintTop_toBottomOf="@+id/imageView" />
</androidx.constraintlayout.widget.ConstraintLayout>
(3)、页面布局调用
(4)获取视频流N21进行转码
MainActivity.java
package com.example.example;
import androidx.appcompat.app.AppCompatActivity;
import androidx.camera.core.CameraX;
import androidx.camera.core.ImageAnalysis;
import androidx.camera.core.ImageProxy;
import androidx.camera.core.Preview;
import androidx.camera.core.UseCase;
import androidx.camera.core.ImageAnalysisConfig;
import androidx.camera.core.PreviewConfig;
import androidx.core.app.ActivityCompat;
import androidx.lifecycle.LifecycleOwner;
import android.Manifest;
import android.annotation.SuppressLint;
import android.content.pm.PackageManager;
import android.graphics.Bitmap;
import android.graphics.BitmapFactory;
import android.graphics.ImageFormat;
import android.graphics.Matrix;
import android.graphics.Rect;
import android.graphics.YuvImage;
import android.os.Bundle;
import android.util.Size;
import android.view.View;
import android.view.ViewGroup;
import android.widget.ImageView;
import java.io.ByteArrayOutputStream;
import java.nio.ByteBuffer;
import java.util.Locale;
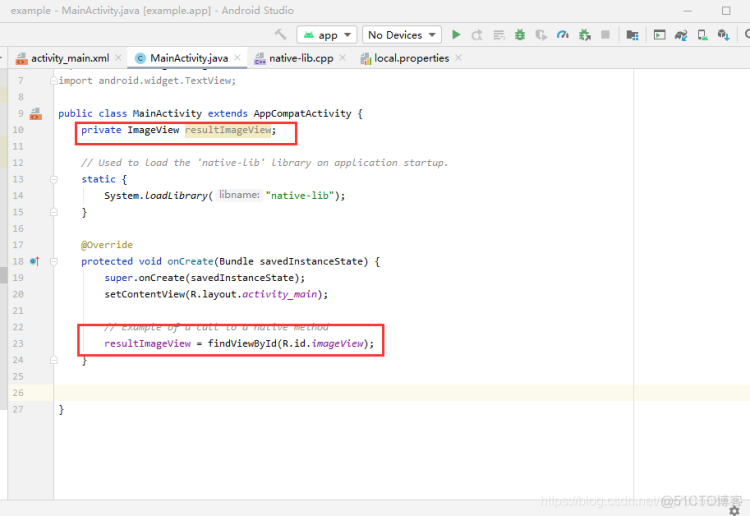
public class MainActivity extends AppCompatActivity {
private ImageView resultImageView;
private static final int REQUEST_EXTERNAL_STORAGE = 1;
private Bitmap allBitmap=null;
private static String[] PERMISSIONS_STORAGE = {
Manifest.permission.READ_EXTERNAL_STORAGE,
Manifest.permission.WRITE_EXTERNAL_STORAGE
};
// Used to load the 'native-lib' library on application startup.
static {
System.loadLibrary("native-lib");
}
@Override
protected void onCreate(Bundle savedInstanceState) {
super.onCreate(savedInstanceState);
setContentView(R.layout.activity_main);
int permission = ActivityCompat.checkSelfPermission(this, Manifest.permission.WRITE_EXTERNAL_STORAGE);
if (permission != PackageManager.PERMISSION_GRANTED) {
// We don't have permission so prompt the user
ActivityCompat.requestPermissions(
this,
PERMISSIONS_STORAGE,
REQUEST_EXTERNAL_STORAGE
);
}
// Example of a call to a native method
resultImageView = findViewById(R.id.imageView);
resultImageView.addOnLayoutChangeListener(new View.OnLayoutChangeListener() {
@Override
public void onLayoutChange(View view, int i, int i1, int i2, int i3, int i4, int i5, int i6, int i7) {
updateTransform();
}
});
resultImageView.post(new Runnable() {
@Override
public void run() {
startCamera();
}
});
//可用的allBitmap
}
private void updateTransform() {
Matrix matrix = new Matrix();
// Compute the center of the view finder
float centerX = resultImageView.getWidth() / 2f;
float centerY = resultImageView.getHeight() / 2f;
float[] rotations = {0, 90, 180, 270};
// Correct preview output to account for display rotation
float rotationDegrees = rotations[resultImageView.getDisplay().getRotation()];
matrix.postRotate(-rotationDegrees, centerX, centerY);
}
private void startCamera() {
CameraX.unbindAll();
// 1. preview
PreviewConfig previewConfig = new PreviewConfig.Builder()
.setLensFacing(CameraX.LensFacing.BACK)
// .setTargetAspectRatio(Rational.NEGATIVE_INFINITY) // 宽高比
.setTargetResolution(new Size(416, 416)) // 分辨率
.build();
Preview preview = new Preview(previewConfig);
preview.setOnPreviewOutputUpdateListener(new Preview.OnPreviewOutputUpdateListener() {
@Override
public void onUpdated(Preview.PreviewOutput output) {
ViewGroup parent = (ViewGroup) resultImageView.getParent();
parent.removeView(resultImageView);
parent.addView(resultImageView, 0);
updateTransform();
}
});
DetectAnalyzer detectAnalyzer = new DetectAnalyzer();
CameraX.bindToLifecycle((LifecycleOwner) this, preview, gainAnalyzer(detectAnalyzer));
}
private UseCase gainAnalyzer(DetectAnalyzer detectAnalyzer) {
ImageAnalysisConfig.Builder analysisConfigBuilder = new ImageAnalysisConfig.Builder();
analysisConfigBuilder.setImageReaderMode(ImageAnalysis.ImageReaderMode.ACQUIRE_LATEST_IMAGE);
analysisConfigBuilder.setTargetResolution(new Size(416, 416)); // 输出预览图像尺寸
ImageAnalysisConfig config = analysisConfigBuilder.build();
ImageAnalysis analysis = new ImageAnalysis(config);
analysis.setAnalyzer(detectAnalyzer);
return analysis;
}
private class DetectAnalyzer implements ImageAnalysis.Analyzer {
@Override
public void analyze(ImageProxy image, final int rotationDegrees) {
final Bitmap bitmapsrc = imageToBitmap(image); // 格式转换
Thread detectThread = new Thread(new Runnable() {
@Override
public void run() {
Matrix matrix = new Matrix();
matrix.postRotate(rotationDegrees);
Bitmap bitmap = Bitmap.createBitmap(bitmapsrc, 0, 0, bitmapsrc.getWidth(), bitmapsrc.getHeight(), matrix, false);
allBitmap = bitmap.copy(Bitmap.Config.ARGB_8888, true);
runOnUiThread(new Runnable() {
@Override
public void run() {
resultImageView.setImageBitmap(allBitmap);
}
});
}
}, "detect");
detectThread.start();
}
private Bitmap imageToBitmap(ImageProxy image) {
ImageProxy.PlaneProxy[] planes = image.getPlanes();
ImageProxy.PlaneProxy y = planes[0];
ImageProxy.PlaneProxy u = planes[1];
ImageProxy.PlaneProxy v = planes[2];
ByteBuffer yBuffer = y.getBuffer();
ByteBuffer uBuffer = u.getBuffer();
ByteBuffer vBuffer = v.getBuffer();
int ySize = yBuffer.remaining();
int uSize = uBuffer.remaining();
int vSize = vBuffer.remaining();
byte[] nv21 = new byte[ySize + uSize + vSize];
// U and V are swapped
yBuffer.get(nv21, 0, ySize);
vBuffer.get(nv21, ySize, vSize);
uBuffer.get(nv21, ySize + vSize, uSize);
YuvImage yuvImage = new YuvImage(nv21, ImageFormat.NV21, image.getWidth(), image.getHeight(), null);
ByteArrayOutputStream out = new ByteArrayOutputStream();
yuvImage.compressToJpeg(new Rect(0, 0, yuvImage.getWidth(), yuvImage.getHeight()), 100, out);
byte[] imageBytes = out.toByteArray();
return BitmapFactory.decodeByteArray(imageBytes, 0, imageBytes.length);
}
}
}
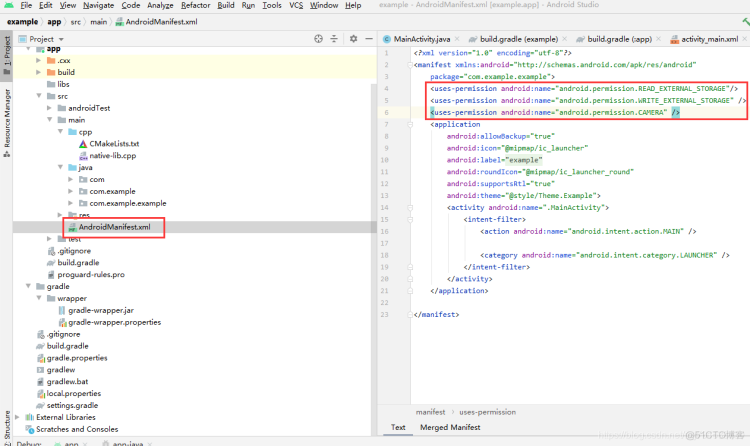
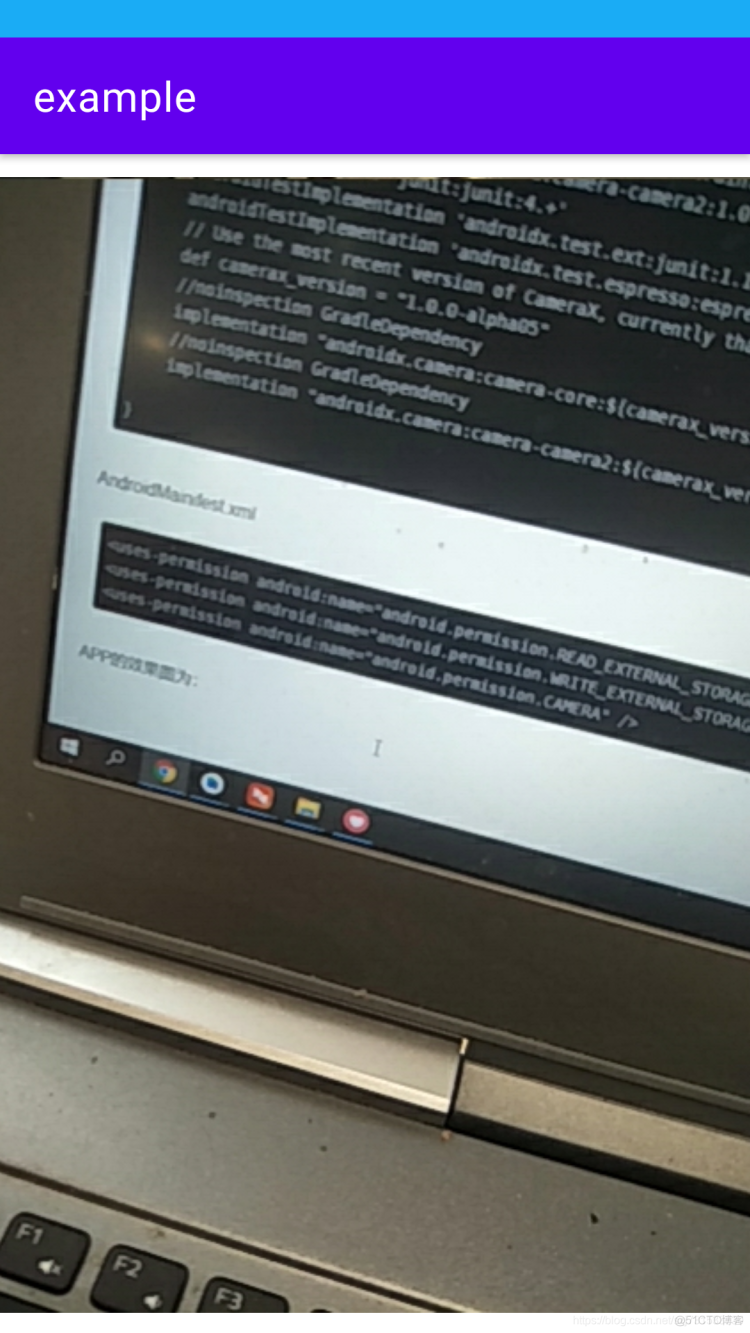
同时需要修改build.gradle和文件AndroidMainifest.xml文件
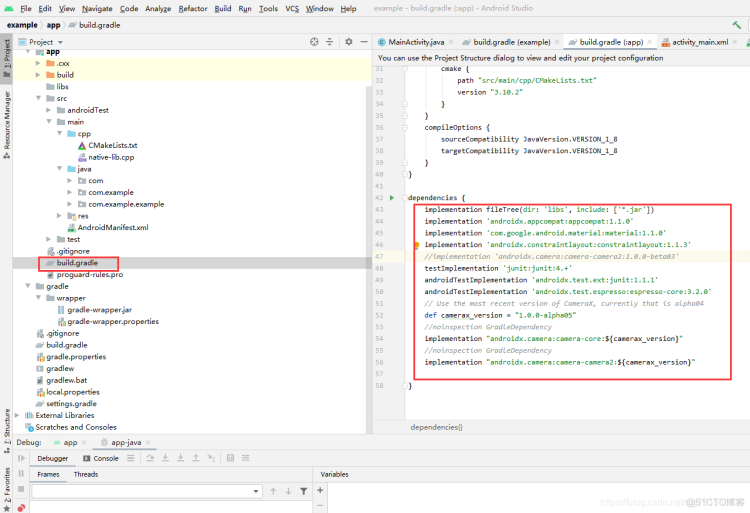
build.gradle
dependencies {
    implementation fileTree(dir: 'libs', include: ['*.jar'])
    implementation 'androidx.appcompat:appcompat:1.1.0'
    implementation 'com.google.android.material:material:1.1.0'
    implementation 'androidx.constraintlayout:constraintlayout:1.1.3'
    //implementation 'androidx.camera:camera-camera2:1.0.0-beta03'
    testImplementation 'junit:junit:4.+'
    androidTestImplementation 'androidx.test.ext:junit:1.1.1'
    androidTestImplementation 'androidx.test.espresso:espresso-core:3.2.0'
    // Use the most recent version of CameraX, currently that is alpha04
    def camerax_version = "1.0.0-alpha05"
    //noinspection GradleDependency
    implementation "androidx.camera:camera-core:${camerax_version}"
    //noinspection GradleDependency
    implementation "androidx.camera:camera-camera2:${camerax_version}"

}
AndroidMainifest.xml
<uses-permission android:name="android.permission.READ_EXTERNAL_STORAGE"/>
<uses-permission android:name="android.permission.WRITE_EXTERNAL_STORAGE" />
<uses-permission android:name="android.permission.CAMERA" />
APP的效果图为:
代码来自github 一个大佬 地址待补充
二、进行Linix\Android的JNI的C++推流,先测试Linux推流测试,然后仿照整个流程,进行Android端的开发测试
导入opencv库参考:6、Android配置opencv4.5及C++ Native Yolo4.0模型检测_sxj731533730-
自己使用ndk的编译工具链编译ffmpeg的动态包,(待补充)
(1)、首先学习一下如何在linux系统上调用ffmpeg的静态包(动态包类似),然后在编译Android的静态包,进行Android手机端的移植使用~
ubuntu@ubuntu:~$ sudo apt-get -y install autoconf automake build-essential libass-dev libfreetype6-dev libsdl2-dev libtheora-dev libtool libva-dev libvdpau-dev libvorbis-dev libxcb1-dev libxcb-shm0-dev libxcb-xfixes0-dev pkg-config texinfo zlib1g-dev yasm libx264-dev libfdk-aac-dev libmp3lame-dev libopus-dev libvpx-dev libx265-dev libbz2-dev nasm
ubuntu@ubuntu:~$ git clone https://github.com/FFmpeg/FFmpeg.git
ubuntu@ubuntu:~$ cd FFmpeg/
ubuntu@ubuntu:~/FFmpeg$./configure --enable-static --enable-libx264 --enable-gpl --enable-encoder=libx264
#仅静态包都构建出来
ubuntu@ubuntu:~/FFmpeg$ make -j8
ubuntu@ubuntu:~/FFmpeg$ sudo make install
ubuntu@ubuntu:~/FFmpeg$ ubuntu@ubuntu:~$ sudo gedit /etc/ld.so.conf
ubuntu@ubuntu:~/FFmpeg$ ubuntu@ubuntu:~$ sudo gedit /etc/ld.so.conf
#填入最后一行信息
ubuntu@ubuntu:~$ cat /etc/ld.so.conf
include /etc/ld.so.conf.d/*.conf
/usr/local/ffmpeg/lib
ubuntu@ubuntu:~$ sudo gedit ~/.bashrc
#填入信息
export PATH="/usr/local/ffmpeg/bin:$PATH"
ubuntu@ubuntu:~$ sudo ldconfig
ubuntu@ubuntu:~$ ffmpeg
ubuntu@ubuntu:~$ ffmpeg
ffmpeg version 4.2.4-1ubuntu0.1 Copyright (c) 2000-2020 the FFmpeg developers
  built with gcc 9 (Ubuntu 9.3.0-10ubuntu2)
  configuration: -./configure --enable-static --enable-libx264 --enable-gpl --enable-encoder=libx264    libavutil      56. 31.100 / 56. 31.100
  libavcodec     58. 54.100 / 58. 54.100
  libavformat    58. 29.100 / 58. 29.100
  libavdevice    58.  8.100 / 58.  8.100
  libavfilter     7. 57.100 /  7. 57.100
  libavresample   4.  0.  0 /  4.  0.  0
  libswscale      5.  5.100 /  5.  5.100
  libswresample   3.  5.100 /  3.  5.100
  libpostproc    55.  5.100 / 55.  5.100
Hyper fast Audio and Video encoder
usage: ffmpeg [options] [[infile options] -i infile]... {[outfile options] outfile}...

Use -h to get full help or, even better, run 'man ffmpeg'
该文件下就是我们可以使用的头文件和动静态库文件
构建Nginx rstp和测试拉流视频详细配置过程在此不在累述:19、树莓派使用FFMPEG推流到PC端显示_sxj731533730-_树莓派ffmpeg推流
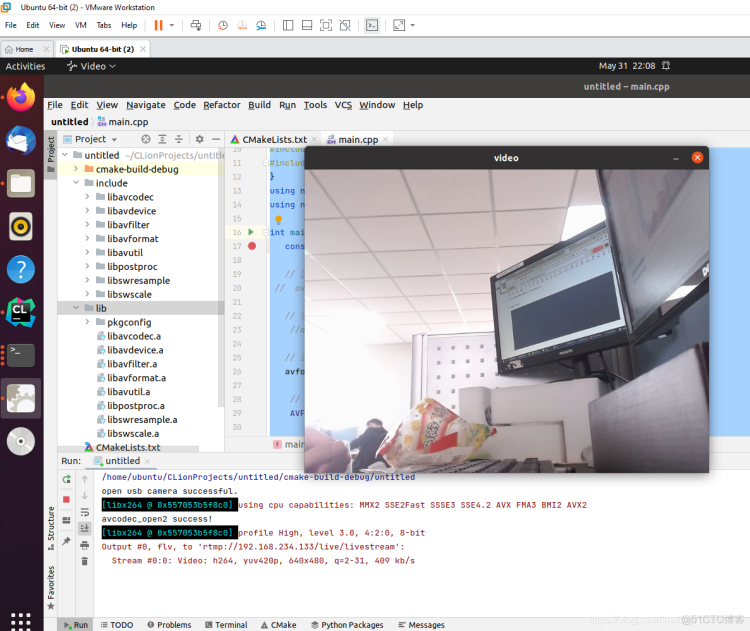
在虚拟机中调用摄像头进行测试
ubuntu@ubuntu:/usr/local/ffmpeg$ ls
bin  include  lib  share
将头文件和静态包移植到clion的IDE中,设置cmakelists.txt
cmakelists.txt内容
cmake_minimum_required(VERSION 3.19)
project(untitled)


set(CMAKE_CXX_STANDARD 14)
find_package(OpenCV REQUIRED)
set(CMAKE_CXX_STANDARD 11)

include_directories(${CMAKE_SOURCE_DIR}/include)

add_library(libavformat STATIC IMPORTED)
set_target_properties(libavformat PROPERTIES IMPORTED_LOCATION ${CMAKE_SOURCE_DIR}/lib/libavformat.a)

add_library(libavdevice STATIC IMPORTED)
set_target_properties(libavdevice PROPERTIES IMPORTED_LOCATION ${CMAKE_SOURCE_DIR}/lib/libavdevice.a)


add_library(libavcodec STATIC IMPORTED)
set_target_properties(libavcodec PROPERTIES IMPORTED_LOCATION ${CMAKE_SOURCE_DIR}/lib/libavcodec.a)

add_library(libavfilter STATIC IMPORTED)
set_target_properties(libavfilter PROPERTIES IMPORTED_LOCATION ${CMAKE_SOURCE_DIR}/lib/libavfilter.a)

add_library(libavutil STATIC IMPORTED)
set_target_properties(libavutil PROPERTIES IMPORTED_LOCATION ${CMAKE_SOURCE_DIR}/lib/libavutil.a)

add_library(libswresample STATIC IMPORTED)
set_target_properties(libswresample PROPERTIES IMPORTED_LOCATION ${CMAKE_SOURCE_DIR}/lib/libswresample.a)
add_library(libswscale STATIC IMPORTED)
set_target_properties(libswscale PROPERTIES IMPORTED_LOCATION ${CMAKE_SOURCE_DIR}/lib/libswscale.a)

add_executable(untitled main.cpp)
target_link_libraries(untitled
        ${OpenCV_LIBS}
        libavformat
        libavdevice
        libavcodec
        libavfilter
        libavutil
        libswresample
        libswscale
        -pthread
        -lz
        -lX11
        -llzma
        -lva
        -lbz2
        -lva-drm
        -lva-x11
        -lvdpau
        -lx264
        )
main.cpp代码
#include <iostream>
#include <vector>
#include <opencv2/highgui.hpp>
#include <opencv2/video.hpp>
#include <opencv2/opencv.hpp>
extern "C"
{
#include <libavformat/avformat.h>
#include <libavcodec/avcodec.h>
#include <libavutil/imgutils.h>
#include <libswscale/swscale.h>
}
using namespace std;
using namespace cv;

int main() {
    const char* out_url = "rtmp://192.168.234.133:1935/live/livestream";

    // 注册所有网络协议
    avformat_network_init();

    // 输出的数据结构
    AVFrame* yuv = NULL;


    Mat frame;

    // 1.使用opencv 打开usb 摄像头
    VideoCapture video_ptr;
    video_ptr.open(0);

    if (!video_ptr.isOpened()) {
        cout << "camera open usb camera error" << endl;
        return -1;
    }

    cout << "open usb camera successful." << endl;

    int width = video_ptr.get(CAP_PROP_FRAME_WIDTH);
    int height = video_ptr.get(CAP_PROP_FRAME_HEIGHT);
    int fps = video_ptr.get(CAP_PROP_FPS);

    // 如果fps为0,这里就设置25。因为在fps=0时,调用avcodec_open2返回-22,
    // 参数不合法
    if (0 == fps) { fps = 25; }

    // 2.初始化格式转换上下文
    SwsContext* sws_context = NULL;
    sws_context = sws_getCachedContext(sws_context,
                                       width, height, AV_PIX_FMT_BGR24,    // 源格式
                                       width, height, AV_PIX_FMT_YUV420P,  // 目标格式
                                       SWS_BICUBIC,    // 尺寸变化使用算法
                                       0, 0, 0);

    if (NULL == sws_context) {
        cout << "sws_getCachedContext error" << endl;
        return -1;
    }


    // 3.初始化输出的数据结构
    yuv = av_frame_alloc();
    yuv->format = AV_PIX_FMT_YUV420P;
    yuv->width = width;
    yuv->height = height;
    yuv->pts = 0;

    // 分配yuv空间
    int ret_code = av_frame_get_buffer(yuv, 32);
    if (0 != ret_code) {
        cout << "  yuv init fail" << endl;
        return -1;
    }

    // 4.初始化编码上下文
    // 4.1找到编码器
    const AVCodec* codec = avcodec_find_encoder(AV_CODEC_ID_H264);
    if (NULL == codec) {
        cout << "Can't find h264 encoder." << endl;
        return -1;
    }

    // 4.2创建编码器上下文
    AVCodecContext* codec_context = avcodec_alloc_context3(codec);
    if (NULL == codec_context) {
        cout << "avcodec_alloc_context3 failed." << endl;
        return -1;
    }


    // 4.3配置编码器参数
    // vc->flags           |= AV_CODEC_FLAG_GLOBAL_HEADER;
    codec_context->codec_id = codec->id;
    codec_context->thread_count = 8;

    // 压缩后每秒视频的bit流 50k
    codec_context->bit_rate = 50 * 1024 * 8;
    codec_context->width = width;
    codec_context->height = height;
    codec_context->time_base = { 1, fps };
    codec_context->framerate = { fps, 1 };

    // 画面组的大小,多少帧一个关键帧
    codec_context->gop_size = 50;
    codec_context->max_b_frames = 0;
    codec_context->pix_fmt = AV_PIX_FMT_YUV420P;
    codec_context->qmin = 10;
    codec_context->qmax = 51;

    AVDictionary* codec_options = nullptr;
    //(baseline | high | high10 | high422 | high444 | main)
    av_dict_set(&codec_options, "profile", "baseline", 0);
    av_dict_set(&codec_options, "preset", "superfast", 0);
    av_dict_set(&codec_options, "tune", "zerolatency", 0);

    // 4.4打开编码器上下文
    ret_code = avcodec_open2(codec_context, codec, &codec_options);
    if (0 != ret_code) {

        return -1;
    }
    cout << "avcodec_open2 success!" << endl;

    // 5.输出封装器和视频流配置
    // 5.1创建输出封装器上下文
    // rtmp flv封装器
    AVFormatContext* format_context = nullptr;
    ret_code = avformat_alloc_output_context2(&format_context, 0, "flv", out_url);
    if (0 != ret_code) {

        return -1;
    }


    // 5.2添加视频流
    AVStream* vs = avformat_new_stream(format_context, NULL);
    if (NULL == vs) {
        cout << "avformat_new_stream failed." << endl;
        return -1;
    }

    vs->codecpar->codec_tag = 0;
    // 从编码器复制参数
    avcodec_parameters_from_context(vs->codecpar, codec_context);
    av_dump_format(format_context, 0, out_url, 1);

    // 打开rtmp 的网络输出IO
    ret_code = avio_open(&format_context->pb, out_url, AVIO_FLAG_WRITE);
    if (0 != ret_code) {
        cout << "avio_open failed." << endl;
        return -1;
    }

    // 写入封装头
    ret_code = avformat_write_header(format_context, NULL);
    if (0 != ret_code) {
        cout << "avformat_write_header failed." << endl;
        return -1;
    }

    AVPacket pack;
    memset(&pack, 0, sizeof(pack));
    int vpts = 0;
    uint8_t* in_data[AV_NUM_DATA_POINTERS] = { 0 };

    int in_size[AV_NUM_DATA_POINTERS] = { 0 };
    for (;;) {

        // 读取rtsp视频帧,解码视频帧
        video_ptr >> frame;
        // If the frame is empty, break immediately
        if (frame.empty()) break;

        imshow("video", frame);
        waitKey(1);

        // rgb to yuv
        in_data[0] = frame.data;
        // 一行(宽)数据的字节数
        in_size[0] = frame.cols * frame.elemSize();
        int h = sws_scale(sws_context, in_data, in_size, 0, frame.rows,
                          yuv->data, yuv->linesize);
        if (h <= 0) { continue; }

        // h264编码
        yuv->pts = vpts;
        vpts++;

        ret_code = avcodec_send_frame(codec_context, yuv);
        if (0 != ret_code) { continue; }

        ret_code = avcodec_receive_packet(codec_context, &pack);

        if (0 != ret_code || pack.buf !=nullptr) {//
            cout << "avcodec_receive_packet." << endl;
        }
        else {
            cout << "avcodec_receive_packet contiune." << endl;
            continue;
        }

        // 推流
        pack.pts = av_rescale_q(pack.pts, codec_context->time_base, vs->time_base);
        pack.dts = av_rescale_q(pack.dts, codec_context->time_base, vs->time_base);
        pack.duration = av_rescale_q(pack.duration,
                                     codec_context->time_base,
                                     vs->time_base);
        ret_code = av_interleaved_write_frame(format_context, &pack);
        if (0 != ret_code)
        {
            cout << "pack is error" << endl;
        }
        av_packet_unref(&pack);
        frame.release();
    }
    av_dict_free(&codec_options);
    avcodec_free_context(&codec_context);
    av_frame_free(&yuv);
    avio_close(format_context->pb);
    avformat_free_context(format_context);
    sws_freeContext(sws_context);
    video_ptr.release();


    destroyAllWindows();
    return 0;
}
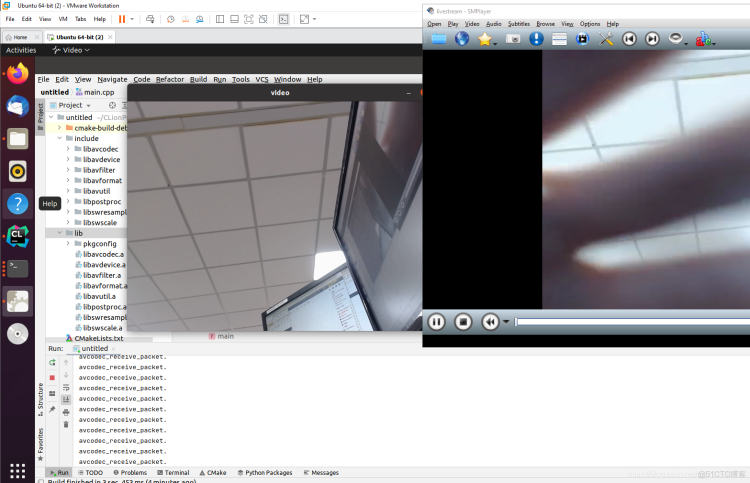
测试成功,有图有真相
内存好像还是在opencv处有问题
==15453== Memcheck, a memory error detector
==15453== Copyright (C) 2002-2017, and GNU GPL'd, by Julian Seward et al.
==15453== Using Valgrind-3.17.0 and LibVEX; rerun with -h for copyright info
==15453== Command: ./untitled
==15453== Parent PID: 12605
==15453==
==15453==
==15453== HEAP SUMMARY:
==15453==     in use at exit: 3,212 bytes in 35 blocks
==15453==   total heap usage: 2,689 allocs, 2,654 frees, 123,166,738 bytes allocated
==15453==
==15453== 4 bytes in 1 blocks are still reachable in loss record 1 of 35
==15453==    at 0x4842FB3: operator new(unsigned long) (in /usr/libexec/valgrind/vgpreload_memcheck-amd64-linux.so)
==15453==    by 0x5028AB4: cv::TLSData<cv::(anonymous namespace)::ThreadID>::createDataInstance() const (in /usr/local/lib/libopencv_core.so.4.5.2)
==15453==    by 0x502A730: cv::TLSDataContainer::getData() const (in /usr/local/lib/libopencv_core.so.4.5.2)
==15453==    by 0x502B410: cv::utils::getThreadID() (in /usr/local/lib/libopencv_core.so.4.5.2)
==15453==    by 0x502C6F9: cv::TLSDataAccumulator<cv::utils::trace::details::TraceManagerThreadLocal>::createDataInstance() const (in /usr/local/lib/libopencv_core.so.4.5.2)
==15453==    by 0x502A730: cv::TLSDataContainer::getData() const (in /usr/local/lib/libopencv_core.so.4.5.2)
==15453==    by 0x4FCFFFE: cv::parallel_for_(cv::Range const&, cv::ParallelLoopBody const&, double) (in /usr/local/lib/libopencv_core.so.4.5.2)
==15453==    by 0x5F0A494: void cv::hal::opt_AVX2::(anonymous namespace)::cvtYUV422toRGB<0, 0, 0, 3>(unsigned char*, unsigned long, unsigned char const*, unsigned long, int, int) (in /usr/local/lib/libopencv_imgproc.so.4.5.2)
==15453==    by 0x5F0B57D: cv::hal::opt_AVX2::cvtOnePlaneYUVtoBGR(unsigned char const*, unsigned long, unsigned char*, unsigned long, int, int, int, bool, int, int) (in /usr/local/lib/libopencv_imgproc.so.4.5.2)
==15453==    by 0x5BD1C48: cv::hal::cvtOnePlaneYUVtoBGR(unsigned char const*, unsigned long, unsigned char*, unsigned long, int, int, int, bool, int, int) (in /usr/local/lib/libopencv_imgproc.so.4.5.2)
==15453==    by 0x5BD2628: cv::cvtColorOnePlaneYUV2BGR(cv::_InputArray const&, cv::_OutputArray const&, int, bool, int, int) (in /usr/local/lib/libopencv_imgproc.so.4.5.2)
==15453==    by 0x5B826D7: cv::cvtColor(cv::_InputArray const&, cv::_OutputArray const&, int, int) (in /usr/local/lib/libopencv_imgproc.so.4.5.2)
==15453==    by 0x48A18C5: cv::CvCaptureCAM_V4L::convertToRgb(cv::Buffer const&) (in /usr/local/lib/libopencv_videoio.so.4.5.2)
==15453==    by 0x48AA04D: cv::CvCaptureCAM_V4L::retrieveFrame(int) (in /usr/local/lib/libopencv_videoio.so.4.5.2)
==15453==    by 0x48747B0: cv::VideoCapture::retrieve(cv::_OutputArray const&, int) (in /usr/local/lib/libopencv_videoio.so.4.5.2)
==15453==    by 0x4874B8E: cv::VideoCapture::operator>>(cv::Mat&) (in /usr/local/lib/libopencv_videoio.so.4.5.2)
==15453==    by 0x212795: main (main.cpp:173)
==15453==
==15453== 4 bytes in 1 blocks are still reachable in loss record 2 of 35
==15453==    at 0x4842FB3: operator new(unsigned long) (in /usr/libexec/valgrind/vgpreload_memcheck-amd64-linux.so)
==15453==    by 0x5028AB4: cv::TLSData<cv::(anonymous namespace)::ThreadID>::createDataInstance() const (in /usr/local/lib/libopencv_core.so.4.5.2)
==15453==    by 0x502A730: cv::TLSDataContainer::getData() const (in /usr/local/lib/libopencv_core.so.4.5.2)
==15453==    by 0x502B410: cv::utils::getThreadID()
.....
==15453==    by 0x4874B8E: cv::VideoCapture::operator>>(cv::Mat&) (in /usr/local/lib/libopencv_videoio.so.4.5.2)
==15453==    by 0x212795: main (main.cpp:173)
==15453==
==15453== 336 bytes in 1 blocks are still reachable in loss record 35 of 35
==15453==    at 0x4842FB3: operator new(unsigned long) (in /usr/libexec/valgrind/vgpreload_memcheck-amd64-linux.so)
==15453==    by 0x4EC55E1: cv::utils::logging::internal::getGlobalLoggingInitStruct() (in /usr/local/lib/libopencv_core.so.4.5.2)
==15453==    by 0x4DFD3A2: _GLOBAL__sub_I_logger.cpp (in /usr/local/lib/libopencv_core.so.4.5.2)
==15453==    by 0x401196D: call_init.part.0 (dl-init.c:74)
==15453==    by 0x4011A57: call_init (dl-init.c:37)
==15453==    by 0x4011A57: _dl_init (dl-init.c:121)
==15453==    by 0x4001109: ??? (in /usr/lib/x86_64-linux-gnu/ld-2.33.so)
==15453==
==15453== LEAK SUMMARY:
==15453==    definitely lost: 0 bytes in 0 blocks
==15453==    indirectly lost: 0 bytes in 0 blocks
==15453==      possibly lost: 288 bytes in 1 blocks
==15453==    still reachable: 2,924 bytes in 34 blocks
==15453==         suppressed: 0 bytes in 0 blocks
==15453==
==15453== For lists of detected and suppressed errors, rerun with: -s
==15453== ERROR SUMMARY: 1 errors from 1 contexts (suppressed: 0 from 0)
三、然后开始Android端的移植 环境配置1、Android 移植C++ 开发的第三方.so包和.a包_sxj731533730_c++开发安卓
首先构建x264四种架构的静态包(参考 FFmpeg 开发(09):FFmpeg、x264以及fdk-aac 编译整合_字节流动_fdk文件)
ubuntu@ubuntu:~$ git clone https://github.com/mirror/x264.git
ubuntu@ubuntu:~$ cd x264/
ubuntu@ubuntu:~/x264$ gedit build.sh
ubuntu@ubuntu:~/x264$ sudo chmod 777 build.sh
ubuntu@ubuntu:~/x264$ mkdir build_android
ubuntu@ubuntu:~/x264$ ./build.sh
注意:官网的x264代码貌似有问题,贴一下x264代码 (20220108)
git clone https://github.com/sxj731533730/x264.git
构建脚本
#!/bin/bash
export NDK=/usr/local/android-ndk-r21e
TOOLCHAIN=$NDK/toolchains/llvm/prebuilt/linux-x86_64
export API=21

function build_android
{
./configure \
    --prefix=$PREFIX \
    --disable-cli \
    --disable-asm \
    --enable-static \
    --enable-pic \
    --host=$my_host \
    --cross-prefix=$CROSS_PREFIX \
    --sysroot=$NDK/toolchains/llvm/prebuilt/linux-x86_64/sysroot \

make clean
make -j8
make install
}


#x86
PREFIX=./android/x86
my_host=i686-linux-android
export TARGET=i686-linux-android
export CC=$TOOLCHAIN/bin/$TARGET$API-clang
export CXX=$TOOLCHAIN/bin/$TARGET$API-clang++
CROSS_PREFIX=$TOOLCHAIN/bin/i686-linux-android-
build_android

#armeabi-v7a
PREFIX=./android/armeabi-v7a
my_host=armv7a-linux-android
export TARGET=armv7a-linux-androideabi
export CC=$TOOLCHAIN/bin/$TARGET$API-clang
export CXX=$TOOLCHAIN/bin/$TARGET$API-clang++
CROSS_PREFIX=$TOOLCHAIN/bin/arm-linux-androideabi-
build_android

#arm64-v8a
PREFIX=./android/arm64-v8a
my_host=aarch64-linux-android
export TARGET=aarch64-linux-android
export CC=$TOOLCHAIN/bin/$TARGET$API-clang
export CXX=$TOOLCHAIN/bin/$TARGET$API-clang++
CROSS_PREFIX=$TOOLCHAIN/bin/aarch64-linux-android-
build_android

#x86_64
PREFIX=./android/x86_64
my_host=x86_64-linux-android
export TARGET=x86_64-linux-android
export CC=$TOOLCHAIN/bin/$TARGET$API-clang
export CXX=$TOOLCHAIN/bin/$TARGET$API-clang++
CROSS_PREFIX=$TOOLCHAIN/bin/x86_64-linux-android-
build_android
进行编译和执行
ubuntu@ubuntu:~$ git clone https://github.com/FFmpeg/FFmpeg.git
ubuntu@ubuntu:~$ cd FFmpeg/
ubuntu@ubuntu:~/FFmpeg$ gedit build.sh
开始ffmpeg的交叉编译
#!/bin/bash
export NDK=/usr/local/android-ndk-r21e
TOOLCHAIN=$NDK/toolchains/llvm/prebuilt/linux-x86_64

function build_android
{

./configure \
--prefix=$PREFIX \
--enable-neon  \
--enable-hwaccels  \
--enable-gpl   \
--disable-postproc \
--disable-static \
--enable-shared \
--disable-debug \
--enable-small \
--enable-jni \
--enable-mediacodec \
--disable-doc \
--enable-ffmpeg \
--disable-ffplay \
--disable-ffprobe \
--disable-avdevice \
--disable-doc \
--disable-symver \
--enable-libx264 \
--enable-encoder=libx264 \
--enable-nonfree \
--enable-muxers \
--enable-decoders \
--enable-demuxers \
--enable-parsers \
--enable-protocols \
--cross-prefix=$CROSS_PREFIX \
--target-os=android \
--arch=$ARCH \
--cpu=$CPU \
--cc=$CC \
--cxx=$CXX \
--enable-cross-compile \
--sysroot=$SYSROOT \
--extra-cflags="-I$X264_INCLUDE -Os -fpic $OPTIMIZE_CFLAGS" \
--extra-ldflags="-lm -L$X264_LIB $ADDI_LDFLAGS"

make clean
make -j8
make install
echo "The Compilation of FFmpeg with x264 $CPU is completed"
}


#armv8-a
ARCH=arm64
CPU=armv8-a
API=21
CC=$TOOLCHAIN/bin/aarch64-linux-android$API-clang
CXX=$TOOLCHAIN/bin/aarch64-linux-android$API-clang++
SYSROOT=$NDK/toolchains/llvm/prebuilt/linux-x86_64/sysroot
CROSS_PREFIX=$TOOLCHAIN/bin/aarch64-linux-android-
PREFIX=$(pwd)/android/$CPU
OPTIMIZE_CFLAGS="-mfloat-abi=softfp -mfpu=vfp -marm -march=$CPU "

BASE_PATH=/home/ubuntu
LIB_TARGET_ABI=arm64-v8a


X264_INCLUDE=$BASE_PATH/x264/android/$LIB_TARGET_ABI/include
X264_LIB=$BASE_PATH/x264/android/$LIB_TARGET_ABI/lib

build_android

cp $X264_LIB/libx264.a $PREFIX/lib

#armv7-a
ARCH=arm
CPU=armv7-a
API=21
CC=$TOOLCHAIN/bin/armv7a-linux-androideabi$API-clang
CXX=$TOOLCHAIN/bin/armv7a-linux-androideabi$API-clang++
SYSROOT=$NDK/toolchains/llvm/prebuilt/linux-x86_64/sysroot
CROSS_PREFIX=$TOOLCHAIN/bin/arm-linux-androideabi-
PREFIX=$(pwd)/android/$CPU
OPTIMIZE_CFLAGS="-mfloat-abi=softfp -mfpu=vfp -marm -march=$CPU "

BASE_PATH=/home/ubuntu
LIB_TARGET_ABI=armeabi-v7a
X264_INCLUDE=$BASE_PATH/x264/android/$LIB_TARGET_ABI/include
X264_LIB=$BASE_PATH/x264/android/$LIB_TARGET_ABI/lib

build_android

cp $X264_LIB/libx264.a $PREFIX/lib
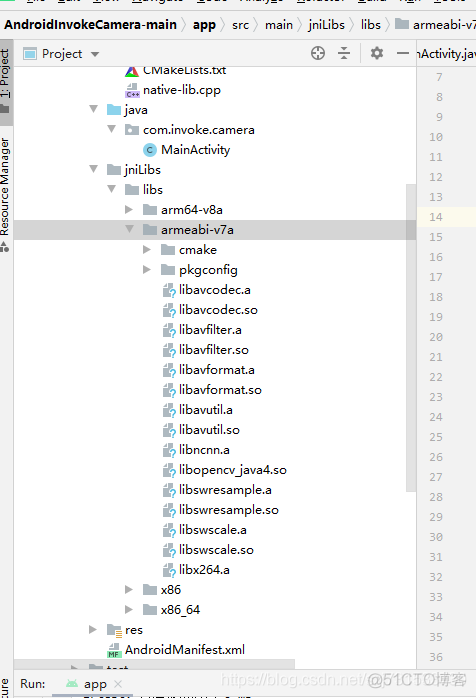
在这里发现一个问题,因为上述android代码提供的是多线程的摄像头获取,总是推流存在问题,因此更换了android的摄像头获取代码使用了 我的另一篇博客的方法5、Android Studio+JNI+Opencv4.5 调用系统相机,实现图像滤波_sxj731533730 或者使用ncnn-naodet-ncnn获取摄像头(我已经改完了 ,公司项目使用,不方便放在这)
修改1 、ffmpeg的编译方法 按照上述方法不变
修改2、在获取摄像头的博客中,填入更新的权限
<uses-permission android:name="android.permission.INTERNET"> </uses-permission>
修改3、填入对应的编译库和cmakelists.txt修正
# For more information about using CMake with Android Studio, read the
# documentation: https://d.android.com/studio/projects/add-native-code.html

# Sets the minimum version of CMake required to build the native library.

cmake_minimum_required(VERSION 3.10.2)

# Declares and names the project.

project("example")

# Creates and names a library, sets it as either STATIC
# or SHARED, and provides the relative paths to its source code.
# You can define multiple libraries, and CMake builds them for you.
# Gradle automatically packages shared libraries with your APK.


# 添加opencv的头文件目录
include_directories(${CMAKE_SOURCE_DIR}/include)

# 导入opencv的so
add_library(libopencv_java4 SHARED IMPORTED)
set_target_properties(libopencv_java4 PROPERTIES IMPORTED_LOCATION ${CMAKE_SOURCE_DIR}/../jniLibs/libs/${ANDROID_ABI}/libopencv_java4.so)


add_library(libavformat SHARED IMPORTED)
set_target_properties(libavformat PROPERTIES IMPORTED_LOCATION ${CMAKE_SOURCE_DIR}/../jniLibs/libs/${ANDROID_ABI}/libavformat.so)


add_library(libavcodec SHARED IMPORTED)
set_target_properties(libavcodec PROPERTIES IMPORTED_LOCATION ${CMAKE_SOURCE_DIR}/../jniLibs/libs/${ANDROID_ABI}/libavcodec.so)

add_library(libavfilter SHARED IMPORTED)
set_target_properties(libavfilter PROPERTIES IMPORTED_LOCATION ${CMAKE_SOURCE_DIR}/../jniLibs/libs/${ANDROID_ABI}/libavfilter.so)

add_library(libavutil SHARED IMPORTED)
set_target_properties(libavutil PROPERTIES IMPORTED_LOCATION ${CMAKE_SOURCE_DIR}/../jniLibs/libs/${ANDROID_ABI}/libavutil.so)

add_library(libswresample SHARED IMPORTED)
set_target_properties(libswresample PROPERTIES IMPORTED_LOCATION  ${CMAKE_SOURCE_DIR}/../jniLibs/libs/${ANDROID_ABI}/libswresample.so)

add_library(libswscale SHARED IMPORTED)
set_target_properties(libswscale PROPERTIES IMPORTED_LOCATION ${CMAKE_SOURCE_DIR}/../jniLibs/libs/${ANDROID_ABI}/libswscale.so)

add_library(X264 STATIC IMPORTED)
set_target_properties(X264 PROPERTIES IMPORTED_LOCATION ${CMAKE_SOURCE_DIR}/../jniLibs/libs/${ANDROID_ABI}/libx264.a)


add_library( # Sets the name of the library.
        native-lib

        # Sets the library as a shared library.
        SHARED

        # Provides a relative path to your source file(s).
        native-lib.cpp )

# Searches for a specified prebuilt library and stores the path as a
# variable. Because CMake includes system libraries in the search path by
# default, you only need to specify the name of the public NDK library
# you want to add. CMake verifies that the library exists before
# completing its build.

find_library( # Sets the name of the path variable.
        log-lib

        # Specifies the name of the NDK library that
        # you want CMake to locate.
        log )

# Specifies libraries CMake should link to your target library. You
# can link multiple libraries, such as libraries you define in this
# build script, prebuilt third-party libraries, or system libraries.


target_link_libraries( # Specifies the target library.
        native-lib
        libopencv_java4
        libavformat
        libavcodec
        libavfilter
        libavutil
        libswresample
        libswscale
        X264
        jnigraphics
        # Links the target library to the log library
        # included in the NDK.
        ${log-lib}

        )
库(可以只编译动态的)
然后测试一下效果
这里只贴一个jni文件吧
#include <jni.h>
#include <android/bitmap.h>
#include <android/log.h>
#include <string>

#include <opencv2/opencv.hpp>
#include <vector>
#include <opencv2/imgproc.hpp>
#include <opencv2/highgui.hpp>
#include <iostream>

#include <iostream>
#include <vector>
#include <opencv2/highgui.hpp>
#include <opencv2/video.hpp>
#include <opencv2/opencv.hpp>
extern "C"
{
#include <libavformat/avformat.h>
#include <libavcodec/avcodec.h>
#include <libavutil/imgutils.h>
#include <libswscale/swscale.h>
}
using namespace std;
using namespace cv;


#define loge(content)   __android_log_write(ANDROID_LOG_ERROR,"eric",content)
const char* out_url = "rtmp://192.168.8.185:1935/live/livestream";
//2 、初始化上下文
SwsContext* sws_context = NULL;
// 3、输出的数据结构
AVFrame* yuv = NULL;
// 4 初始化编码器
//AVCodec* codec = NULL;
//5、初始化编码器上下文
AVCodecContext* codec_context = NULL;
//6、初始化编码器选项
AVDictionary* codec_options = NULL;
//初始化格式上下文
AVFormatContext* format_context = NULL;
//
AVStream* vs = NULL;
//
AVPacket pack;
int fps = 25;
int vpts = 0;
uint8_t* in_data[AV_NUM_DATA_POINTERS] = { 0 };

int in_size[AV_NUM_DATA_POINTERS] = { 0 };

char buf[1024]={0};


extern "C"
JNIEXPORT jint JNICALL
Java_com_invoke_camera_MainActivity_BitmapRTSPInt(JNIEnv *env, jobject thiz, jint width,
                                                 jint height) {

    // 注册所有网络协议
    avformat_network_init();

    // 2.初始化格式转换上下文
    sws_context = sws_getCachedContext(sws_context,
                                       width, height, AV_PIX_FMT_BGR24,    // 源格式
                                       width, height, AV_PIX_FMT_YUV420P,  // 目标格式
                                       SWS_BICUBIC,    // 尺寸变化使用算法
                                       0, 0, 0);

    if (NULL == sws_context) {
        cout << "sws_getCachedContext error" << endl;
        return -1;
    }

    // 3.初始化输出的数据结构
    yuv = av_frame_alloc();
    yuv->format = AV_PIX_FMT_YUV420P;
    yuv->width = width;
    yuv->height = height;
    yuv->pts = 0;

    // 分配yuv空间
    int ret_code = av_frame_get_buffer(yuv, 32);
    if (0 != ret_code) {
        cout << "  yuv init fail" << endl;
        return -1;
    }

    // 4.初始化编码上下文
    // 4.1找到编码器
    const  AVCodec*  codec = avcodec_find_encoder(AV_CODEC_ID_H264);
    if (NULL == codec) {
        cout << "Can't find h264 encoder." << endl;
        return -1;
    }

    // 4.2创建编码器上下文
    codec_context = avcodec_alloc_context3(codec);
    if (NULL == codec_context) {
        cout << "avcodec_alloc_context3 failed." << endl;
        return -1;
    }

    // 4.3配置编码器参数
    // vc->flags           |= AV_CODEC_FLAG_GLOBAL_HEADER;
    codec_context->codec_id = codec->id;
    codec_context->thread_count = 8;

    // 压缩后每秒视频的bit流 50k
    codec_context->bit_rate = 50 * 1024 * 8;
    codec_context->width = width;
    codec_context->height = height;
    codec_context->time_base = { 1, fps };
    codec_context->framerate = { fps, 1 };

    // 画面组的大小,多少帧一个关键帧
    codec_context->gop_size = 50;
    codec_context->max_b_frames = 0;
    codec_context->pix_fmt = AV_PIX_FMT_YUV420P;
    codec_context->qmin = 10;
    codec_context->qmax = 51;


    //(baseline | high | high10 | high422 | high444 | main)
    av_dict_set(&codec_options, "profile", "baseline", 0);
    av_dict_set(&codec_options, "preset", "superfast", 0);
    av_dict_set(&codec_options, "tune", "zerolatency", 0);

    // 4.4打开编码器上下文
    ret_code = avcodec_open2(codec_context, codec, &codec_options);
    if (0 != ret_code) {
        av_strerror(ret_code, buf, sizeof(buf));
        loge(string().append("format_context:").append(buf).c_str());
        return -1;
    }
    cout << "avcodec_open2 success!" << endl;


    // 5.输出封装器和视频流配置
    // 5.1创建输出封装器上下文
    // rtmp flv封装器

    ret_code = avformat_alloc_output_context2(&format_context, 0, "flv", out_url);
    if (0 != ret_code) {
        av_strerror(ret_code, buf, sizeof(buf));
        loge(string().append("format_context:").append(buf).c_str());
        return -1;
    }


    // 5.2添加视频流
    vs = avformat_new_stream(format_context, NULL);
    if (NULL == vs) {
        cout << "avformat_new_stream failed." << endl;
        return -1;
    }

    vs->codecpar->codec_tag = 0;
    // 从编码器复制参数
    avcodec_parameters_from_context(vs->codecpar, codec_context);
    av_dump_format(format_context, 0, out_url, 1);

    // 打开rtmp 的网络输出IO
    ret_code = avio_open(&format_context->pb, out_url, AVIO_FLAG_WRITE);
    if (0 != ret_code) {
        av_strerror(ret_code, buf, sizeof(buf));
        loge(string().append("format_context:").append(buf).c_str());
        return -1;
    }

    // 写入封装头
    ret_code = avformat_write_header(format_context, NULL);
    if (0 != ret_code) {
        av_strerror(ret_code, buf, sizeof(buf));
        loge(string().append("format_context:").append(buf).c_str());
        return -1;
    }


    memset(&pack, 0, sizeof(pack));

    return 0;

}

extern "C"
JNIEXPORT jint  JNICALL
Java_com_invoke_camera_MainActivity_BitmapRTSPStart(JNIEnv *env, jobject thiz, jobject bitmap) {
    // TODO: implement FFmpegtoBitmap()
    // TODO: implement DetectYolo()
    // 加载图像
    //取图片检测
    AndroidBitmapInfo inBmpInfo;
    void *inPixelsAddress;
    int ret;
    if ((ret = AndroidBitmap_getInfo(env, bitmap, &inBmpInfo)) < 0) {
        return -1;
    }
    if ((ret = AndroidBitmap_lockPixels(env, bitmap, &inPixelsAddress)) < 0) {
        return -1;
    }
    cv::Mat rgbaImage;
    rgbaImage.create(inBmpInfo.height, inBmpInfo.width, CV_8UC4);
    cv::Mat inMat(inBmpInfo.height, inBmpInfo.width, CV_8UC4, inPixelsAddress);

    //cv::bitwise_not(inMat,inMat);   //修改bitmap地址内容
    // 对inMat 操作 就是对java的bitmap 进行操作
    cvtColor(inMat, rgbaImage, COLOR_mRGBA2RGBA);
    cv::Mat currentFrame;
    currentFrame.create(inBmpInfo.height, inBmpInfo.width, CV_8UC3);

    cvtColor(rgbaImage, currentFrame, COLOR_RGBA2BGR);


    //进行推流的代码逻辑
    // If the frame is empty, break immediately
    if (currentFrame.empty()) {
        return -1;
    }


    // rgb to yuv
    in_data[0] = currentFrame.data;
    // 一行(宽)数据的字节数
    in_size[0] = currentFrame.cols * currentFrame.elemSize();
    int ret_code = sws_scale(sws_context, in_data, in_size, 0, currentFrame.rows,
                             yuv->data, yuv->linesize);
    if (ret_code <= 0) {
        av_strerror(ret_code, buf, sizeof(buf));
        loge(string().append("sws_context:").append(buf).c_str());
        return -1; }

    // h264编码
    yuv->pts = vpts;
    vpts++;
    if(vpts<0)
    {
        vpts=0;
    }
    ret_code = avcodec_send_frame(codec_context, yuv);
    if (0 != ret_code) {
        av_strerror(ret_code, buf, sizeof(buf));
        loge(string().append("codec_context:").append(buf).c_str());
        return -1; }

    ret_code = avcodec_receive_packet(codec_context, &pack);

    if (0 != ret_code || pack.buf != nullptr) {//
        cout << "avcodec_receive_packet." << endl;
    }
    else {
        av_strerror(ret_code, buf, sizeof(buf));
        loge(string().append("avcodec_receive_packet:").append(buf).c_str());
        cout << "avcodec_receive_packet contiune." << endl;
        return -1;
    }

    // 推流
    pack.pts = av_rescale_q(pack.pts, codec_context->time_base, vs->time_base);
    pack.dts = av_rescale_q(pack.dts, codec_context->time_base, vs->time_base);
    pack.duration = av_rescale_q(pack.duration,
                                 codec_context->time_base,
                                 vs->time_base);
    ret_code = av_interleaved_write_frame(format_context, &pack);
    if (0 != ret_code)
    {
        av_strerror(ret_code, buf, sizeof(buf));
        loge(string().append("format_context:").append(buf).c_str());
        cout << "pack is error" << endl;
        return -1;
    }
    av_packet_unref(&pack);


    //正常显示图片rgbaImage imwrite() 显示
    AndroidBitmap_unlockPixels(env,bitmap);
    rgbaImage.release();
    inMat.release();
    currentFrame.release();
    return 0;


}

extern "C"
JNIEXPORT void JNICALL
Java_com_invoke_camera_MainActivity_BitmapRTSPDestory(JNIEnv *env, jobject thiz) {
    // TODO: implement BitmapDestory()
    av_dict_free(&codec_options);
    avcodec_free_context(&codec_context);
    av_frame_free(&yuv);
    avio_close(format_context->pb);
    avformat_free_context(format_context);
    sws_freeContext(sws_context);
}
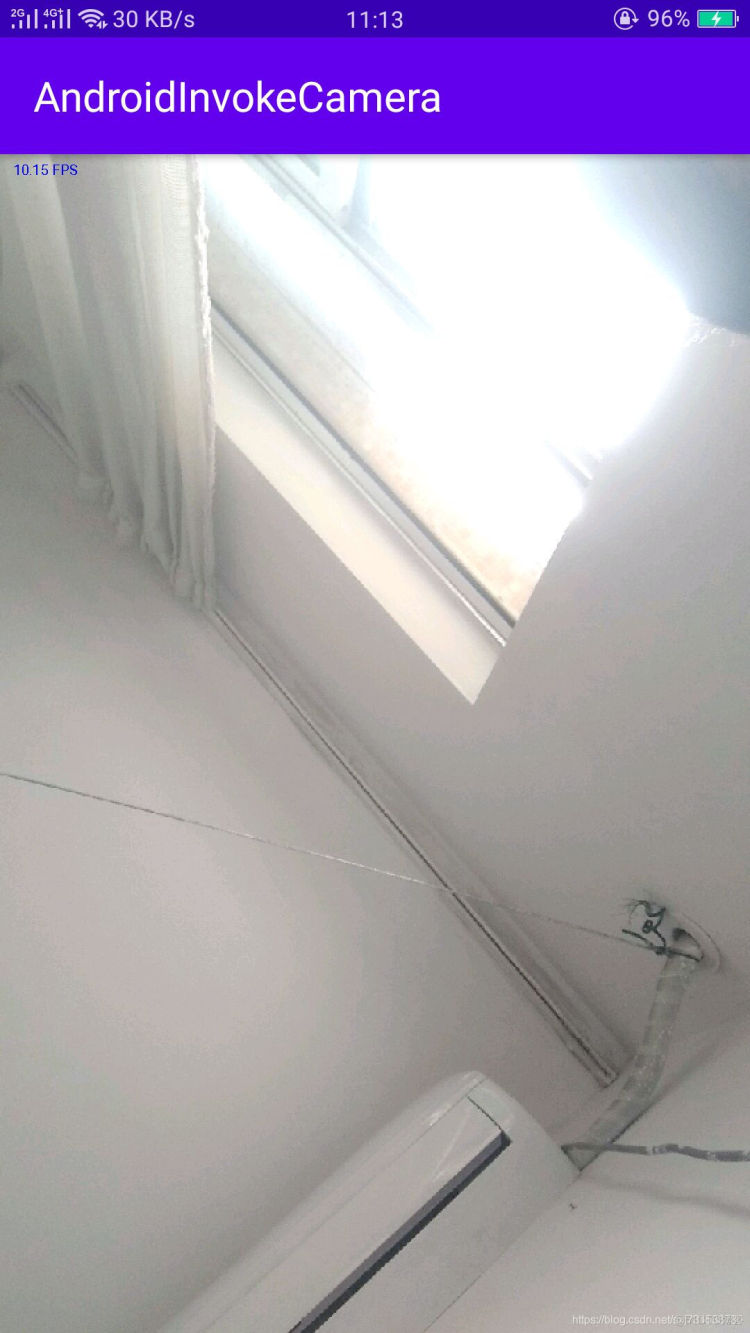
手机的图片
笔记本作为服务器的图片
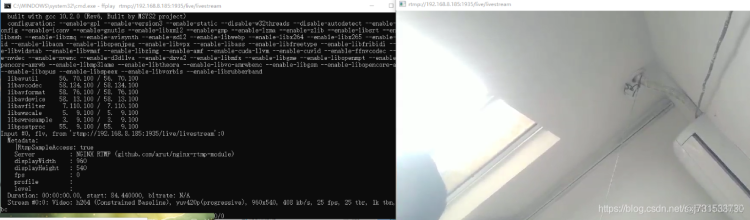
贴一下效果图
内存使用很稳定

代码地址
https://github.com/sxj731533730/AndroidFFmpegCamera


.png)

.png)

